Feast with AI – feed your MLflow models with feature store

feast

In this article I will show how to prepare complete MLOPS solution based on the Feast feature store and MLflow platform.

Before you will continue reading please watch short introduction:

The whole solution will be deployed on the kubernetes (mlflow_feast.yaml).

component

We will use:

propensity to buy

To better visualize the whole process we will use the Propensity to buy example where I base on the Kaggle examples and data.
mlops

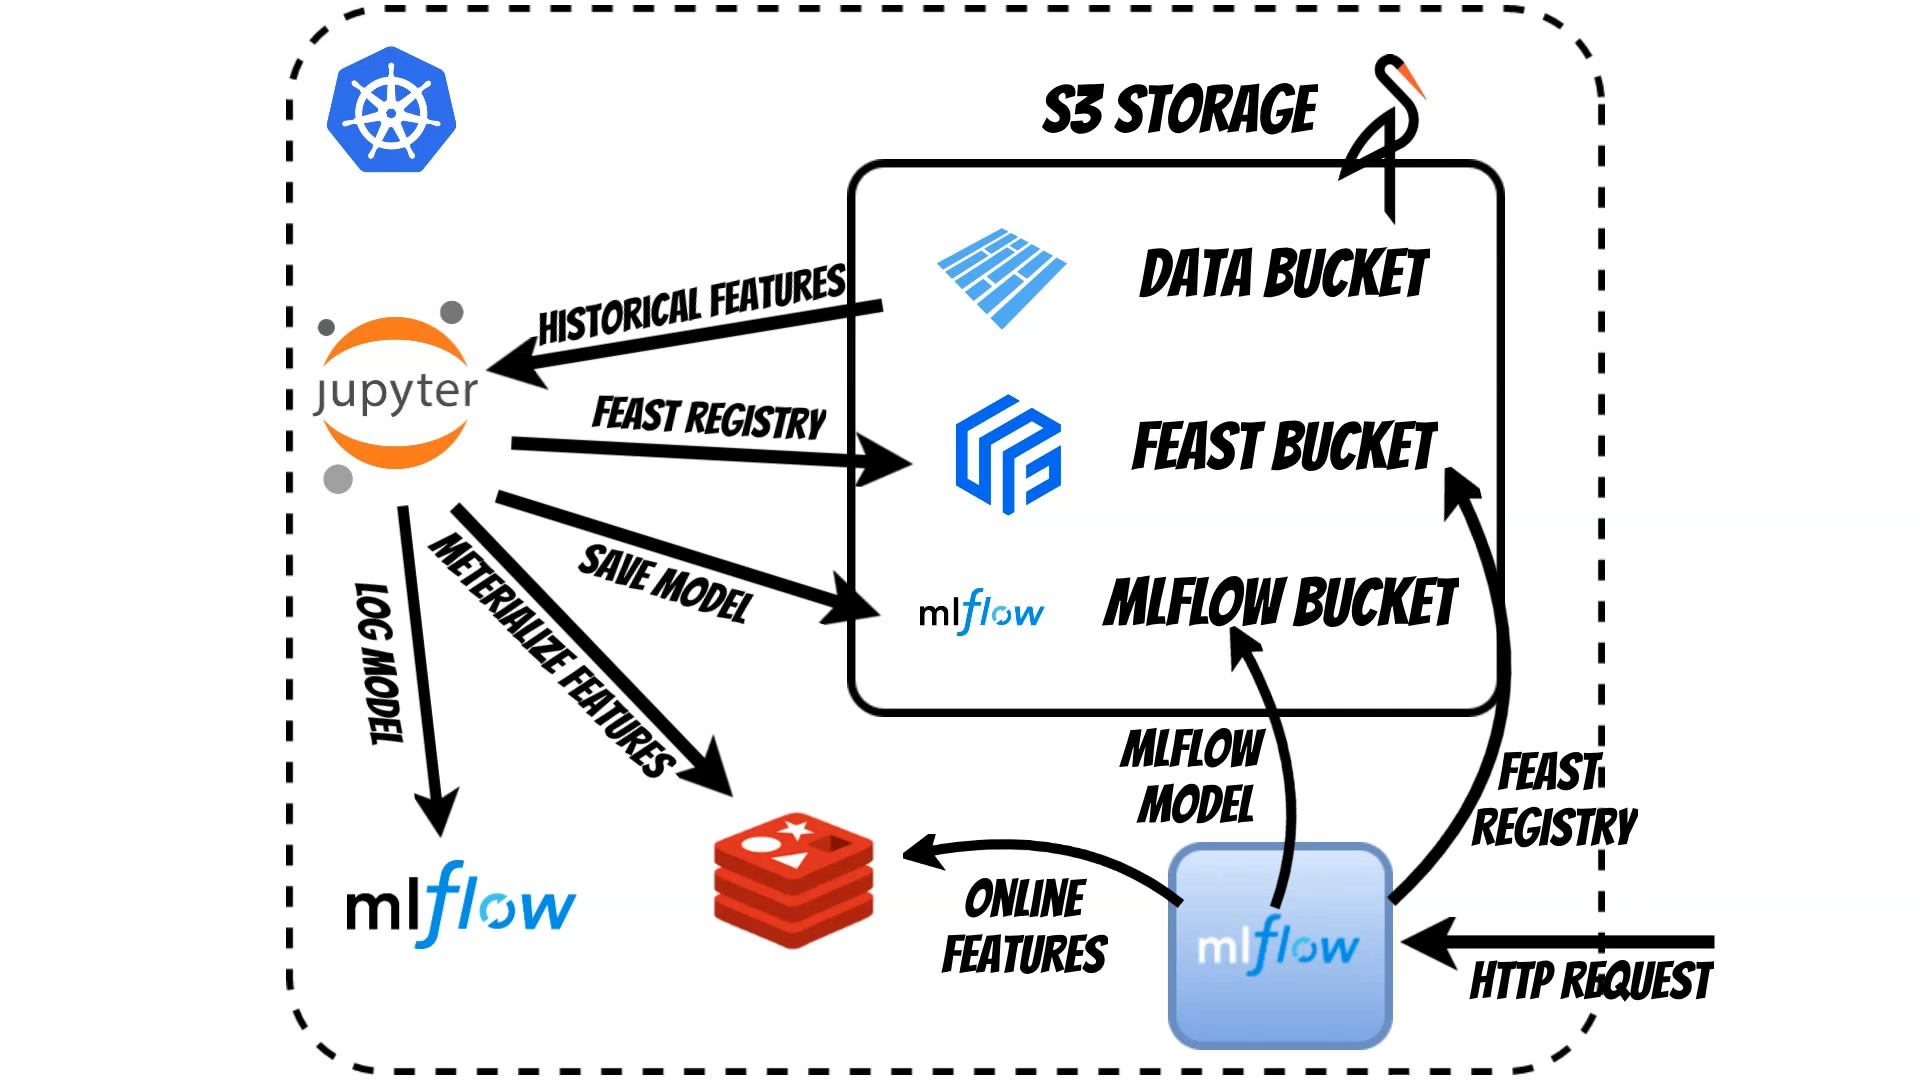
We start in Jupyter Notebook where we prepare Feast feature store schema which is kept in S3.

We can simply inspect the Feast schema in Jupyter Notebook:

from feast import FeatureStore
from IPython.core.display import display, HTML
import json
from json2html import *
import warnings
warnings.filterwarnings('ignore')

class FeastSchema:
    def __init__(self, repo_path: str):
        self.store = FeatureStore(repo_path=repo_path)
    
    def show_schema(self, skip_meta: bool= False):
        feast_schema=self.__project_show_schema(skip_meta)        
        display(HTML(json2html.convert(json = feast_schema)))

    def show_table_schema(self, table: str, skip_meta: bool= False):
        feasture_tables_dictionary=self.__project_show_schema(skip_meta)
        display(HTML(json2html.convert(json = {table:feasture_tables_dictionary[table]})))

    def __project_show_schema(self, skip_meta: bool= False):
        entities_dictionary={}
        feast_entities=self.store.list_entities()
        for entity in feast_entities:
            entity_dictionary=entity.to_dict()
            entity_spec=entity_dictionary['spec']
            entities_dictionary[entity_spec['name']]=entity_spec
        
        feasture_tables_dictionary={}
        feast_feature_tables=self.store.list_feature_views()
        for feature_table in feast_feature_tables:
            feature_table_dict=json.loads(str(feature_table))
            feature_table_spec=feature_table_dict['spec']
            feature_table_name=feature_table_spec['name']
            feature_table_spec.pop('name',None)
            if 'entities' in feature_table_spec:
                feature_table_entities=[]
                for entity in feature_table_spec['entities']:
                    feature_table_entities.append(entities_dictionary[entity])
                feature_table_spec['entities']=feature_table_entities
                
            if not skip_meta:
                feature_table_spec['meta']=feature_table_dict['meta']
            else:
                feature_table_spec.pop('input',None)
                feature_table_spec.pop('ttl',None)
                feature_table_spec.pop('online',None)
                
            feasture_tables_dictionary[feature_table_name]=feature_table_spec
        
        return feasture_tables_dictionary


FeastSchema(".").show_schema()
#FeastSchema(".").show_schema(skip_meta=True)
#FeastSchema(".").show_table_schema('driver_hourly_stats')
#FeastSchema().show_tables()

In our case we store the data in Apache Parquet files in S3 bucket. Using the Feast we can fetch the historical features and train the model using Scikit-learn library

bucket_name="propensity"
filename="training_sample"

store = FeatureStore(repo_path=".")

s3 = fs.S3FileSystem(endpoint_override=os.environ.get("FEAST_S3_ENDPOINT_URL"))
entity_df=pd.read_parquet(f'{bucket_name}/{filename}_entities.parquet', filesystem=s3)
entity_df["event_timestamp"]=datetime.now()


training_df = store.get_historical_features(
    entity_df=entity_df, 
    feature_refs = [
        'propensity_data:basket_icon_click',
        'propensity_data:basket_add_list',
        'propensity_data:basket_add_detail',
        'propensity_data:sort_by',
        'propensity_data:image_picker',
        'propensity_data:account_page_click',
        'propensity_data:promo_banner_click',
        'propensity_data:detail_wishlist_add',
        'propensity_data:list_size_dropdown',
        'propensity_data:closed_minibasket_click',
        'propensity_data:checked_delivery_detail',
        'propensity_data:checked_returns_detail',
        'propensity_data:sign_in',
        'propensity_data:saw_checkout',
        'propensity_data:saw_sizecharts',
        'propensity_data:saw_delivery',
        'propensity_data:saw_account_upgrade',
        'propensity_data:saw_homepage',
        'propensity_data:device_mobile',
        'propensity_data:device_computer',
        'propensity_data:device_tablet',
        'propensity_data:returning_user',
        'propensity_data:loc_uk',
        'propensity_data:ordered'
    ],
).to_df()

predictors = training_df.drop(['propensity_data__ordered','UserID','event_timestamp'], axis=1)
targets = training_df['propensity_data__ordered']

X_train, X_test, y_train, y_test = train_test_split(predictors, targets, test_size=.3)

classifier=GaussianNB(var_smoothing=input_params['var_smoothing'])
classifier=classifier.fit(X_train,y_train)

predictions=classifier.predict(X_test)

conf_matrix=sklearn.metrics.confusion_matrix(y_test,predictions)
ac_score=sklearn.metrics.accuracy_score(y_test, predictions)

propensity_model_path = 'propensity.joblib'
joblib.dump(classifier, propensity_model_path)

artifacts = {
    "propensity_model": propensity_model_path,
    "feature_store": "feature_store.yaml"
}

The model will use online Feast redis features as well as additional features from the request thus we need to wrap the MLflow model and define it:

import mlflow.pyfunc
class PropensityWrapper(mlflow.pyfunc.PythonModel):
    
    def load_context(self, context):
        import joblib
        from feast import FeatureStore
        import pandas as pd 
        import os
        
        self.model = joblib.load(context.artifacts["propensity_model"])
        self.store = FeatureStore(repo_path=os.environ.get("FEAST_REPO_PATH"))
        
    def predict(self, context, model_input):
        users=list(model_input.to_dict()["UserID"].values())
        
        feature_vector = self.store.get_online_features(
            feature_refs=[
                'propensity_data:basket_icon_click',
                'propensity_data:basket_add_list',
                'propensity_data:basket_add_detail',
                'propensity_data:sort_by',
                'propensity_data:image_picker',
                'propensity_data:account_page_click',
                'propensity_data:promo_banner_click',
                'propensity_data:detail_wishlist_add',
                'propensity_data:list_size_dropdown',
                'propensity_data:closed_minibasket_click',
                'propensity_data:checked_delivery_detail',
                'propensity_data:checked_returns_detail',
                'propensity_data:sign_in',
                'propensity_data:saw_checkout',
                'propensity_data:saw_sizecharts',
                'propensity_data:saw_delivery',
                'propensity_data:saw_account_upgrade',
                'propensity_data:saw_homepage',
                'propensity_data:returning_user',
                'propensity_data:loc_uk'
            ],
            entity_rows=[{"UserID": uid} for uid in users]
        ).to_dict()
        
        data=pd.DataFrame.from_dict(feature_vector)
        merged_data = pd.merge(model_input,data, how="inner", on=["UserID"], suffixes=('_x', '')).drop(['UserID'], axis=1)
        return self.model.predict(merged_data)

Now we can log the MLflow model to the repository:

import warnings
import sys

import pandas as pd
import numpy as np
from sklearn.metrics import mean_squared_error, mean_absolute_error, r2_score
from sklearn.model_selection import train_test_split
from sklearn.linear_model import ElasticNet
from urllib.parse import urlparse
import mlflow
import mlflow.sklearn
import mlflow.pyfunc

#conda_env=mlflow.pyfunc.get_default_conda_env()

with mlflow.start_run():
    
    #mlflow.log_param("var_smoothing", input_params['var_smoothing'])
    mlflow.log_metric("accuracy_score", ac_score)
    
    tracking_url_type_store = urlparse(mlflow.get_tracking_uri()).scheme

    if tracking_url_type_store != "file":
        mlflow.pyfunc.log_model("model",
                                 registered_model_name="propensity_model",
                                 python_model=PropensityWrapper(),
                                 artifacts=artifacts,
                                 conda_env=conda_env)
    else:
        mlflow.pyfunc.log_model("model",
                                 path=my_model_path,
                                 python_model=PropensityWrapper(),
                                 artifacts=artifacts,
                                 conda_env=conda_env)

We can export the code and run is using MLflow cli:

mlflow run . --no-conda --experiment-name="propensity" -P var_smoothing=1e-9

Now we need to materialize features to Redis:

feast materialize 2021-03-22T23:42:00 2021-06-22T23:42:00

Using MLflow we can simply deploy model as a microservice in k8s. In our case we want to deploy the model models:/propensity_model/Production which is currently assigned for Production. During start the MLflow will automatically fetch the proper model from S3:

apiVersion: apps/v1
kind: Deployment
metadata:
  name: mlflow-serving
  namespace: qooba
spec:
  replicas: 1
  selector:
    matchLabels:
      app: mlflow-serving
      version: v1
  template:
    metadata:
      labels:
        app: mlflow-serving
        version: v1
    spec:
      containers:
      - image: qooba/mlflow:serving
        imagePullPolicy: IfNotPresent
        name: mlflow-serving
        env:
        - name: MLFLOW_TRACKING_URI
          value: http://mlflow.qooba.svc.cluster.local:5000
        - name: AWS_ACCESS_KEY_ID
          valueFrom:
            secretKeyRef:
              name: minio-auth
              key: username
        - name: AWS_SECRET_ACCESS_KEY
          valueFrom:
            secretKeyRef:
              name: minio-auth
              key: password
        - name: MLFLOW_S3_ENDPOINT_URL
          value: http://minio.qooba.svc.cluster.local:9000
        - name: FEAST_S3_ENDPOINT_URL
          value: http://minio.qooba.svc.cluster.local:9000
        - name: REDIS_TYPE
          value: REDIS
        - name: REDIS_CONNECTION_STRING
          value: redis.qooba.svc.cluster.local:6379,db=0
        - name: FEAST_TELEMETRY
          value: "false"
        - name: FEAST_REPO_PATH
          value: /feast_repository
        - name: PORT
          value: "5000"
        - name: MODEL
          value: models:/propensity_model/Production
        ports:
        - containerPort: 5000
        volumeMounts:
          - mountPath: /feast_repository
            name: config
      volumes:
        - name: config
          configMap:
            name: mlflow-serving
            items:
            - key: feature_store
              path: feature_store.yaml

On each HTTP request:

import requests
import json

url="http://mlflow-serving.qooba.svc.cluster.local:5000/invocations"

headers={
    'Content-Type': 'application/json; format=pandas-records'
}

data=[
    {"UserID": "a720-6b732349-a720-4862-bd21-644732",
     'propensity_data:device_mobile': 1.0,
     'propensity_data:device_computer': 0.0,
     'propensity_data:device_tablet': 0.0
    }
]

response=requests.post(url, data=json.dumps(data), headers=headers)
response.text

The model will fetch the client features (based on UserID) from Redis and HTTP request and generate prediction.

Flink with AI – how to use Flink with MLflow model in Jupyter Notebook

squirrel

In this article I will show how to process streams with Apache Flink and MLflow model

Before you will continue reading please watch short introduction:

Apache Flink allows for an efficient and scalable way of processing streams. It is a distributed processing engine which supports multiple sources like: Kafka, NiFi and many others (if we need custom, we can create them ourselves).

Apache Flink also provides the framework for defining streams operations in languages like: Java, Scala, Python and SQL.

To simplify the such definitions we can use Jupyter Notebook as a interface. Of course we can write in Python using PyFlink library but we can make it even easier using writing jupyter notebook extension (“magic words”).

Using Flink extension (magic.ipynb) we can simply use Flink SQL sql syntax directly in Jupyter Notebook.

To use the extesnions we need to load it:

%reload_ext flinkmagic

Then we need to initialize the Flink StreamEnvironment:

%flink_init_stream_env

Now we can use the SQL code for example:

FileSystem connector:

%%flink_execute_sql
CREATE TABLE MySinkTable (
    word varchar,
    cnt bigint) WITH (
        'connector.type' = 'filesystem',
        'format.type' = 'csv',
        'connector.path' = '/opt/flink/notebooks/data/word_count_output1')

MySQL connector:

%%flink_execute_sql
CREATE TABLE MySinkDbSmsTable (
    smstext varchar,
    smstype varchar) WITH (
        'connector.type' = 'jdbc',
        'connector.url' = 'jdbc:mysql://mysql:3306/test',
        'connector.table' = 'sms',
        'connector.driver' = 'com.mysql.jdbc.Driver',
        'connector.write.flush.interval' = '10',
        'connector.username' = 'root',
        'connector.password' = 'my-secret-pw')

Kafka connector:

%%flink_execute_sql
CREATE TABLE MySourceKafkaTable (word varchar) WITH (
    'connector.type' = 'kafka',
    'connector.version' = 'universal',
    'connector.topic' = 'test',
    'connector.startup-mode' = 'latest-offset',
    'connector.properties.bootstrap.servers' = 'kafka:9092',
    'connector.properties.group.id' = 'test',
    'format.type' = 'csv'
        )

The magic keyword will automatically execute SQL in existing StreamingEnvironment.

Now we can apply the Machine Learning model. In plain Flink we can use UDF function defined in python but we will use MLflow model which wraps the ML frameworks (like PyTorch, Tensorflow, Scikit-learn etc.). Because MLflow expose homogeneous interface we can create another “jupyter magic” which will automatically load MLflow model as a Flink function.

%flink_mlflow "SPAM_CLASSIFIER" "/mlflow/mlruns/2/64a89b0a6b7346498316bfae4c298535/artifacts/model" "[DataTypes.STRING()]" "DataTypes.STRING()"

Now we can simply write Flink SQL query:

%%flink_sql_query
SELECT word as smstext, SPAM_CLASSIFIER(word) as smstype FROM MySourceKafkaTable

which in our case will fetch kafka events and classify it using MLflow spam classifier. The results will be displayed in the realtime in the Jupyter Notebook as a events DataFrame.

If we want we can simply use other python libraries (like matplotlib and others) to create graphical representation of the results eg. pie chart.

You can find the whole code including: Flink examples, extension and Dockerfiles here: https://github.com/qooba/flink-with-ai.

You can also use docker image: qooba/flink:dev to test and run notebooks inside. Please check the run.sh where you have all components (Kafka, MySQL, Jupyter with Flink, MLflow repository).

Animated Art with AI – face reeanactment in action

faces

In this article I will show how to use artificial intelligence to add motion to the images and photos.

Before you will continue reading please watch short introduction:

Face reenactment

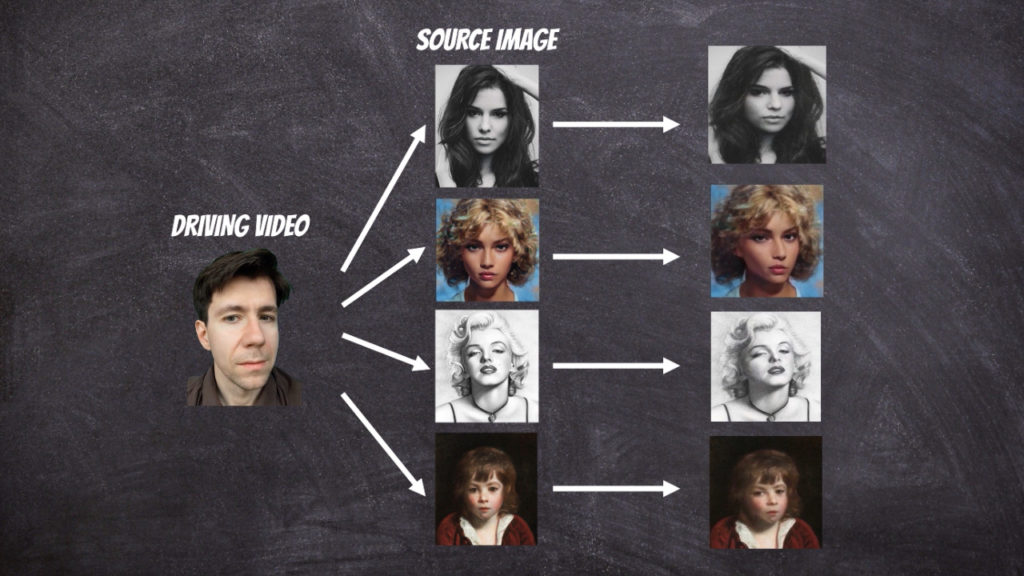
To bring photos to life we can use the face reenactment algorithm designed to transfer the facial movements in the video to another image.

face reenactment diagram

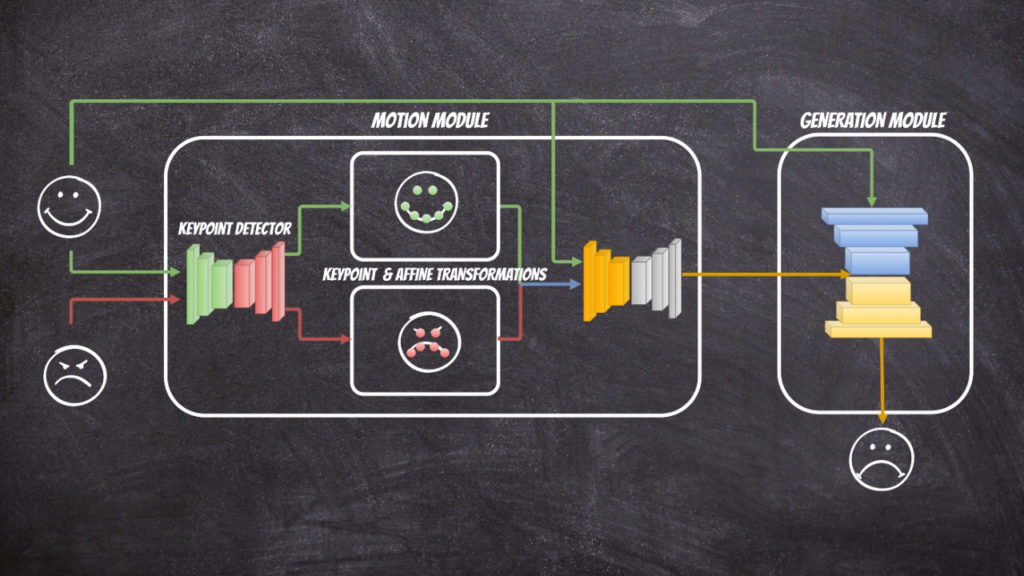
In this project I have used github implementation: https://github.com/AliaksandrSiarohin/first-order-model. Where the extensive description of the neural network architecture can be found in this paper. The solution contains of two parts: motion module and generation module. The motion module at the first stage extracts the key points from the source and target image. In fact in the solution we assume that reference image which we can to the source and target image exists and at the first stage the transformations from reference image to source ([latex]T_{S \leftarrow R} (p_k)[/latex]) and target ([latex]T_{T \leftarrow R} (p_k)[/latex]) image is calculated respectively. Then the first order Taylor expansions [latex]\frac{d}{dp}T_{S \leftarrow R} (p)| {p=p_k}[/latex] and [latex]\frac{d}{dp}T_{T \leftarrow R} (p)| {p=p_k}[/latex] is used to calculate dense motion field. The generation module use calculated dense motion field and source image to generate new image that will resemble target image.

face reenactment diagram

The whole solution is packed into docker image thus we can simply reproduce the results using command:

docker run -it --rm --gpus all -v $(pwd)/torch_models:/root/.torch/models -v $(pwd)/checkpoints:/ai/checkpoints -v $(pwd)/test:/ai/test qooba/aifacereeanactment python3 ./prepare.py --source_image /ai/test/test.jpg --driving_video /ai/test/test.mp4 --output /ai/test/test_generated.mp4

NOTE: additional volumes (torch_models and checkpoints) are mount because during first run the trained neural networks are downloaded.

To reproduce the results we need to provide two files motion video and source image. In above example I put them into test directory and mount it into docker container (-v $(pwd)/test:/ai/test) to use them into it.

Below you have all command line options:

usage: prepare.py [-h] [--config CONFIG] [--checkpoint CHECKPOINT]
                  [--source_image SOURCE_IMAGE]
                  [--driving_video DRIVING_VIDEO] [--crop_image]
                  [--crop_image_padding CROP_IMAGE_PADDING [CROP_IMAGE_PADDING ...]]
                  [--crop_video] [--output OUTPUT] [--relative]
                  [--no-relative] [--adapt_scale] [--no-adapt_scale]
                  [--find_best_frame] [--best_frame BEST_FRAME] [--cpu]

first-order-model

optional arguments:
  -h, --help            show this help message and exit
  --config CONFIG       path to config
  --checkpoint CHECKPOINT
                        path to checkpoint to restore
  --source_image SOURCE_IMAGE
                        source image
  --driving_video DRIVING_VIDEO
                        driving video
  --crop_image, -ci     autocrop image
  --crop_image_padding CROP_IMAGE_PADDING [CROP_IMAGE_PADDING ...], -cip CROP_IMAGE_PADDING [CROP_IMAGE_PADDING ...]
                        autocrop image paddings left, upper, right, lower
  --crop_video, -cv     autocrop video
  --output OUTPUT       output video
  --relative            use relative or absolute keypoint coordinates
  --no-relative         don't use relative or absolute keypoint coordinates
  --adapt_scale         adapt movement scale based on convex hull of keypoints
  --no-adapt_scale      no adapt movement scale based on convex hull of
                        keypoints
  --find_best_frame     Generate from the frame that is the most alligned with
                        source. (Only for faces, requires face_aligment lib)
  --best_frame BEST_FRAME
                        Set frame to start from.
  --cpu                 cpu mode.

New Face with AI

faces

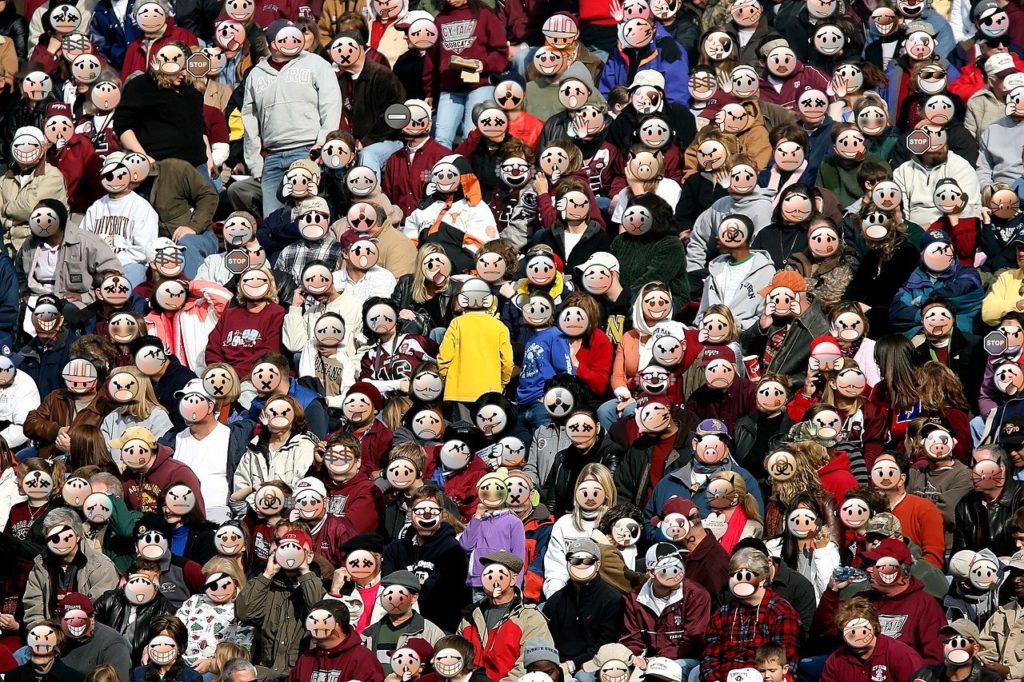
In this article I will show how to use artificial intelligence to generate human faces.

Before you will continue reading please watch short introduction:

Generative adversarial network

To generate realistic human faces, we can use neural networks with GAN (Generative adversarial network) architecture.

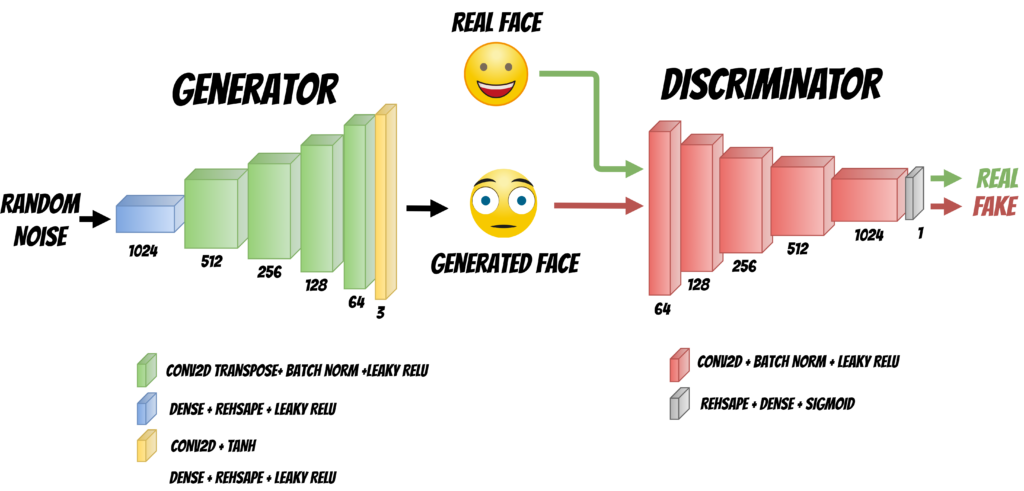
neural network architecture

The GaN network consists of two parts of the Generator whose task is to generate the image from random input and a discriminator that checks if the generated image is realistic.

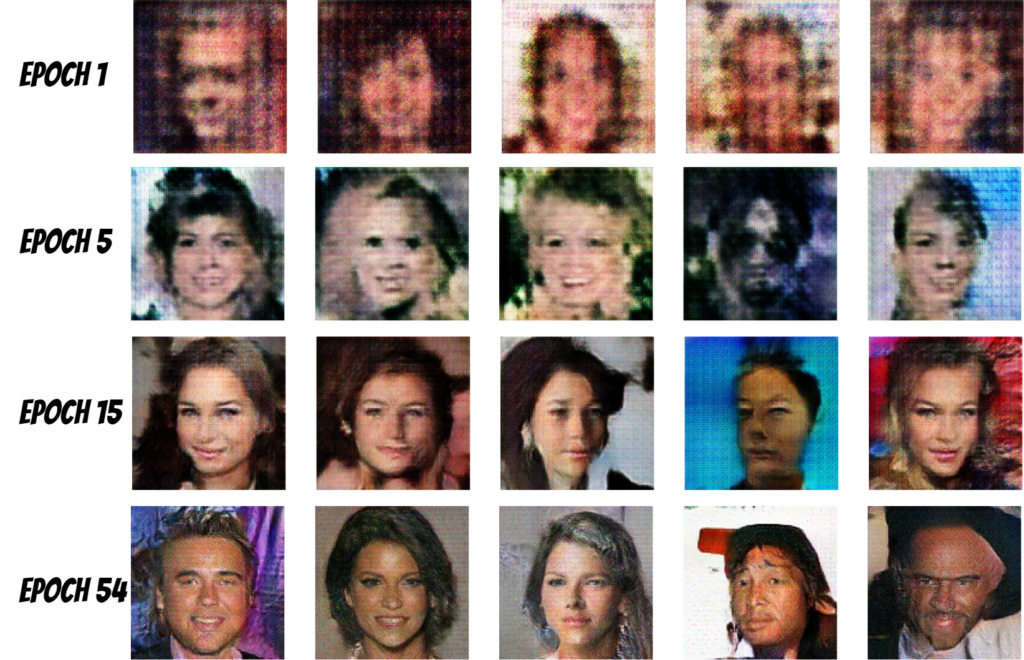
training progress

During training, the networks compete with each other, the generator tries to generate better and better images and thereby deceive the Discriminator. On the other hand, the Discriminator learns to distinguish between real and generated photos.

To train the discriminator, we use both real photos and those generated by the generator.

Finally, we can achieve the following results using DCGAN network. As you can see some faces look realistic while some are distorted, additionally the network can only generate low resolution images.

training results

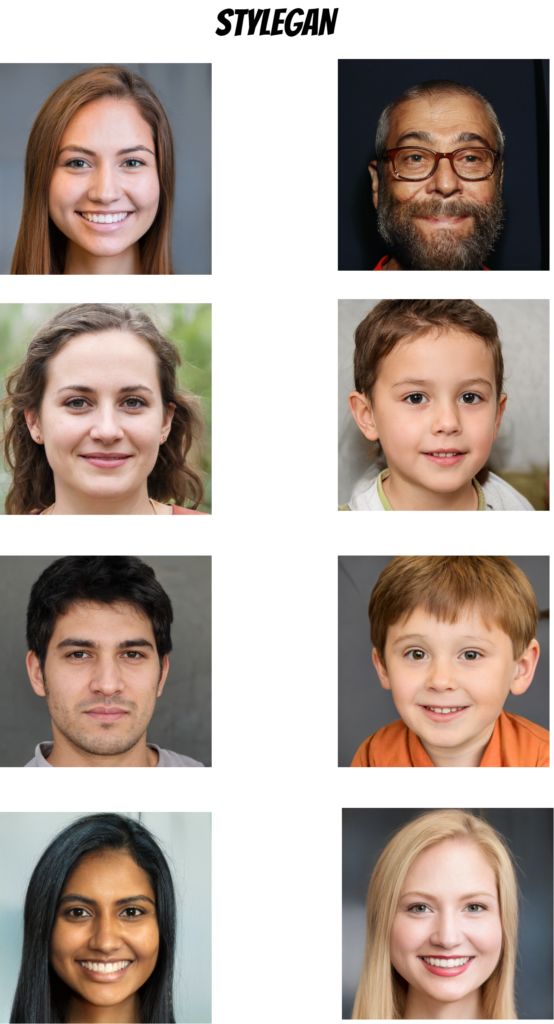
We can achieve much better results using the StyleGaN (arxiv article) network, which, among other things, differs in that the next layers of the network are progressively added during training.

I generated the images using pretrained networks and the effect is really amazing.

results stylegan

Unblur low quality face images with AI

clay

In this article I will show how to improve the quality of blurred face images using artificial intelligence. For this purpose I will use neural networks and FastAI library (ver. 1)

The project code is available on my github: https://github.com/qooba/aiunblur You can also use ready docker image: https://hub.docker.com/repository/docker/qooba/aiunblur

Before you will continue reading please watch short introduction:

I have based o lot on the fastai course thus I definitely recommend to go through it.

Data

To train neural network how to rebuild the face images we need to provide the faces dataset which will show how low quality and blurred images should be reconstructed. Thus we need pairs of low and high quality images.

To prepare the data set we can use available fases dataset eg. FFHQ, Tufts Face Database, CelebA

We will treat the original images as a high resolution data and rescale them to prepare low resolution input:

import fastai
from fastai.vision import *
from fastai.callbacks import *
from fastai.utils.mem import *
from torchvision.models import vgg16_bn
from pathlib import Path

path = Path('/opt/notebooks/faces')
path_hr = path/'high_resolution'
path_lr = path/'small-96'

il = ImageList.from_folder(path_hr)

def resize_one(fn, i, path, size):
    dest = path/fn.relative_to(path_hr)
    dest.parent.mkdir(parents=True, exist_ok=True)
    img = PIL.Image.open(fn)
    targ_sz = resize_to(img, size, use_min=True)
    img = img.resize(targ_sz, resample=PIL.Image.BILINEAR).convert('RGB')
    img.save(dest, quality=60)

sets = [(path_lr, 96)]
for p,size in sets:
    if not p.exists(): 
        print(f"resizing to {size} into {p}")
        parallel(partial(resize_one, path=p, size=size), il.items)

Now we can create data bunch for training:

bs,size=32,128
arch = models.resnet34
src = ImageImageList.from_folder(path_lr).split_by_rand_pct(0.1, seed=42)

def get_data(bs,size):
    data = (src.label_from_func(lambda x: path_hr/x.name)
           .transform(get_transforms(max_zoom=2.), size=size, tfm_y=True)
           .databunch(bs=bs,num_workers=0).normalize(imagenet_stats, do_y=True))

    data.c = 3
    return data

data = get_data(bs,size)

Training

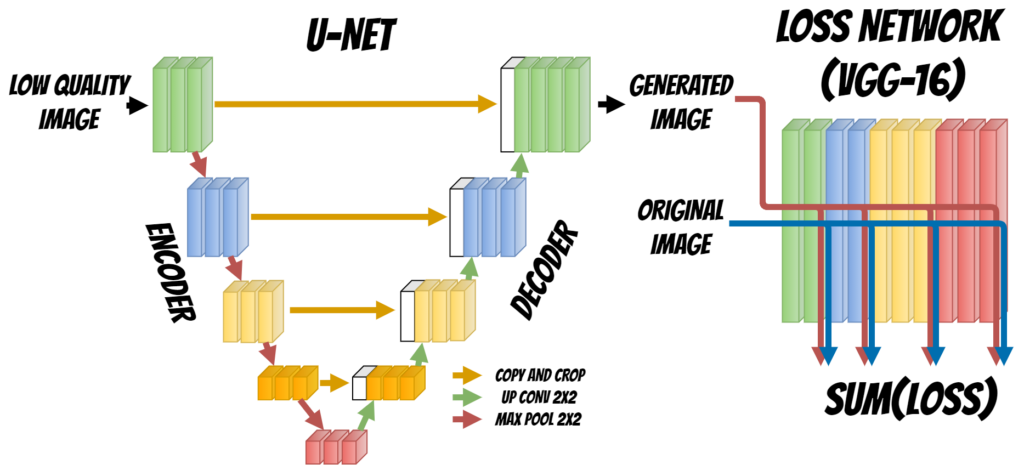
In this solution we will use a neural network with UNET architecture.

neural network architecture

The UNET neural network contains two parts Encoder and Decoder which are used to reconstruct the face image. During the first stage Encoder fetch the input, extracts and aggregates the image features. At each stage the features maps are donwsampled. Then Decoder uses extracted features and tries to rebuild the image upsampling it at each decoding stage. Finally we get regenerated images.

Additionally we need to define the Loss Function which will tell the model if the image was rebuilt correctly and allow to train the model.

To do this we will use additional neural network VGG-16. We will put Generated image and Original image (which is our target) to the network input. Then will compare the features extracted for both images at selected layers and according to this calculated the loss.

Finally we will use Adam optmizer to minimize the loss and achieve better result.

def gram_matrix(x):
    n,c,h,w = x.size()
    x = x.view(n, c, -1)
    return (x @ x.transpose(1,2))/(c*h*w)

base_loss = F.l1_loss

vgg_m = vgg16_bn(True).features.cuda().eval()
requires_grad(vgg_m, False)

blocks = [i-1 for i,o in enumerate(children(vgg_m)) if isinstance(o,nn.MaxPool2d)]

class FeatureLoss(nn.Module):
    def __init__(self, m_feat, layer_ids, layer_wgts):
        super().__init__()
        self.m_feat = m_feat
        self.loss_features = [self.m_feat[i] for i in layer_ids]
        self.hooks = hook_outputs(self.loss_features, detach=False)
        self.wgts = layer_wgts
        self.metric_names = ['pixel',] + [f'feat_{i}' for i in range(len(layer_ids))
              ] + [f'gram_{i}' for i in range(len(layer_ids))]

    def make_features(self, x, clone=False):
        self.m_feat(x)
        return [(o.clone() if clone else o) for o in self.hooks.stored]
    
    def forward(self, input, target):
        out_feat = self.make_features(target, clone=True)
        in_feat = self.make_features(input)
        self.feat_losses = [base_loss(input,target)]
        self.feat_losses += [base_loss(f_in, f_out)*w
                             for f_in, f_out, w in zip(in_feat, out_feat, self.wgts)]
        self.feat_losses += [base_loss(gram_matrix(f_in), gram_matrix(f_out))*w**2 * 5e3
                             for f_in, f_out, w in zip(in_feat, out_feat, self.wgts)]
        self.metrics = dict(zip(self.metric_names, self.feat_losses))
        return sum(self.feat_losses)
    
    def __del__(self): self.hooks.remove()

feat_loss = FeatureLoss(vgg_m, blocks[2:5], [5,15,2])

learn = unet_learner(data, arch, wd=wd, loss_func=feat_loss, callback_fns=LossMetrics,
                     blur=True, norm_type=NormType.Weight)

Results

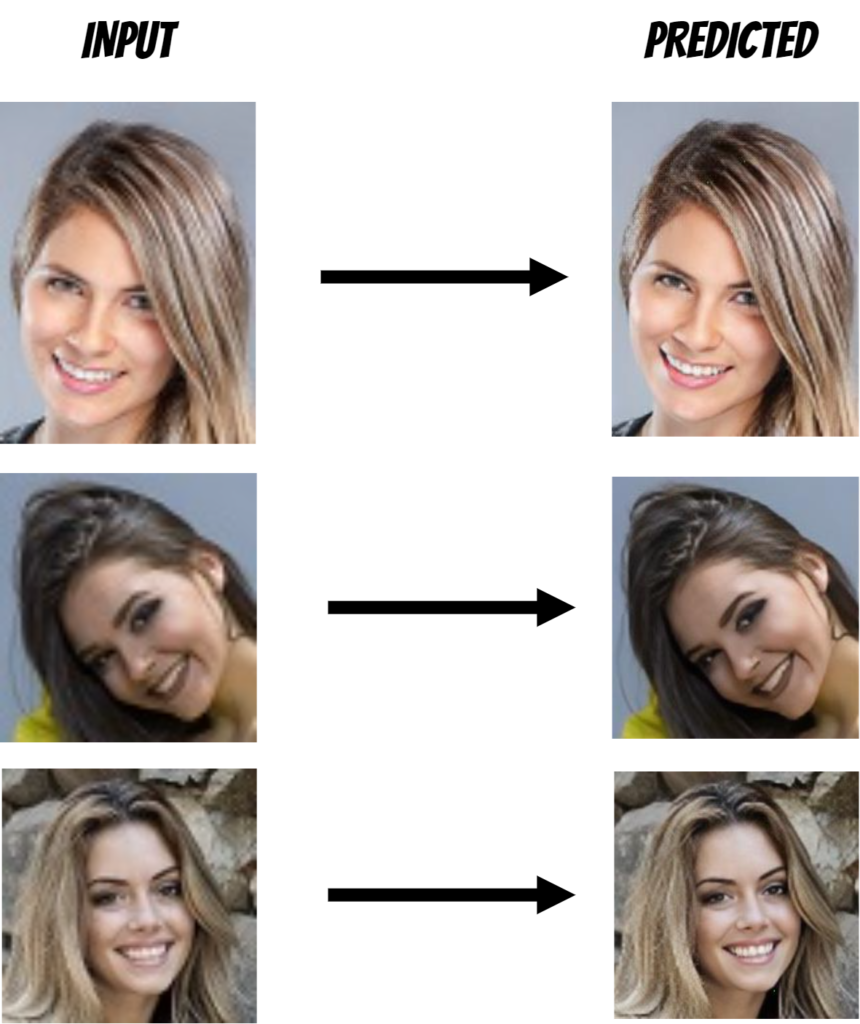
After training we can use the model to regenerate the images:

results

Application

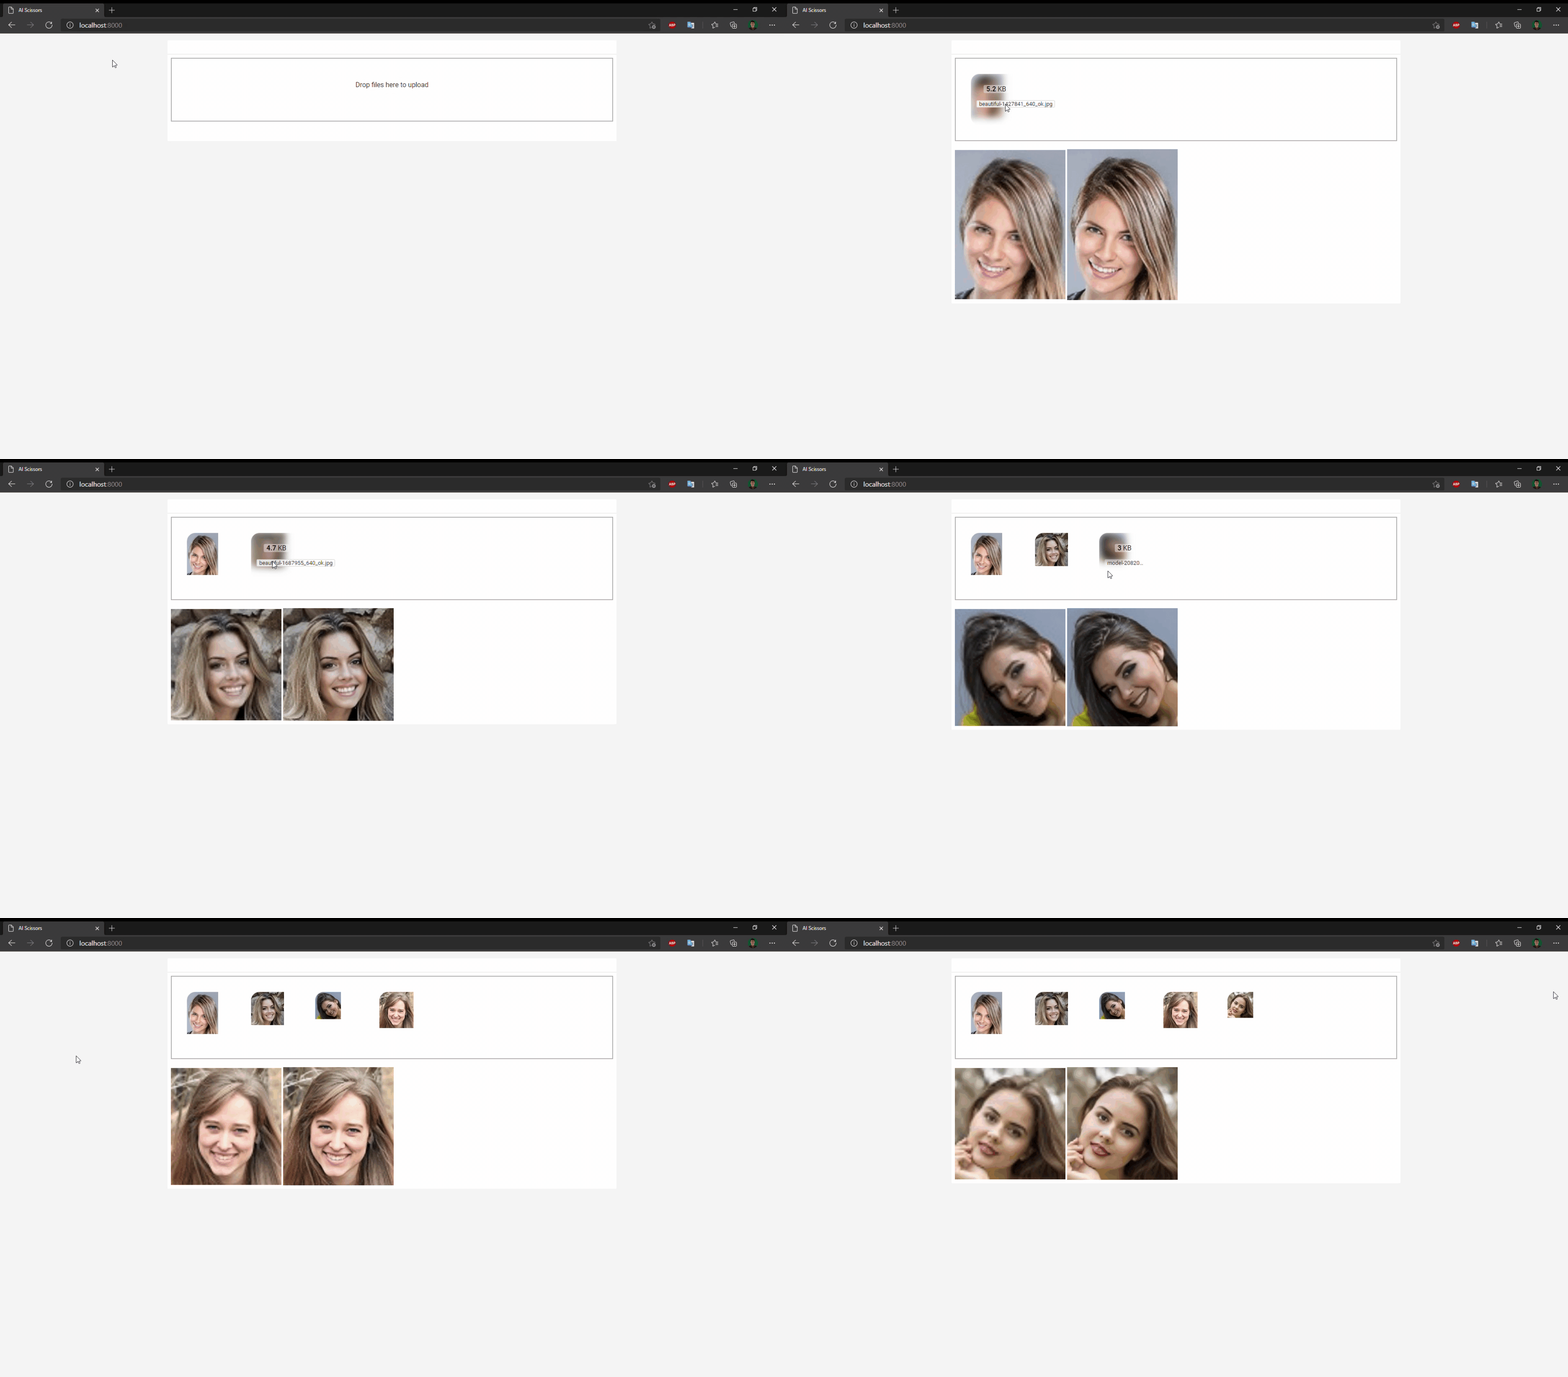
Finally we can export the model and create the drag and drop application which fix the face images in web application.

results

The whole solution is packed into docker images thus you can simply start it using commands:

# with GPU
docker run -d --gpus all --rm -p 8000:8000 --name aiunblur qooba/aiunblur

# without GPU
docker run -d --rm -p 8000:8000 --name aiunblur qooba/aiunblur

To use GPU additional nvidia drivers (included in the NVIDIA CUDA Toolkit) are needed.