Animated Art with AI – face reeanactment in action
29 Mar 2021
In this article I will show how to use artificial intelligence to add motion to the images and photos.
Before you will continue reading please watch short introduction:
Face reenactment
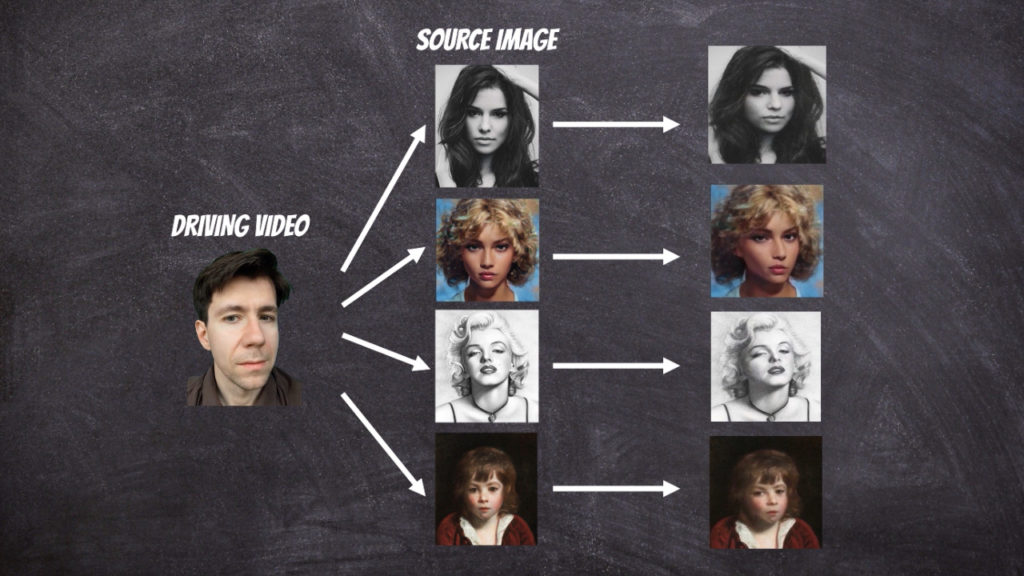
To bring photos to life we can use the face reenactment algorithm designed to transfer the facial movements in the video to another image.
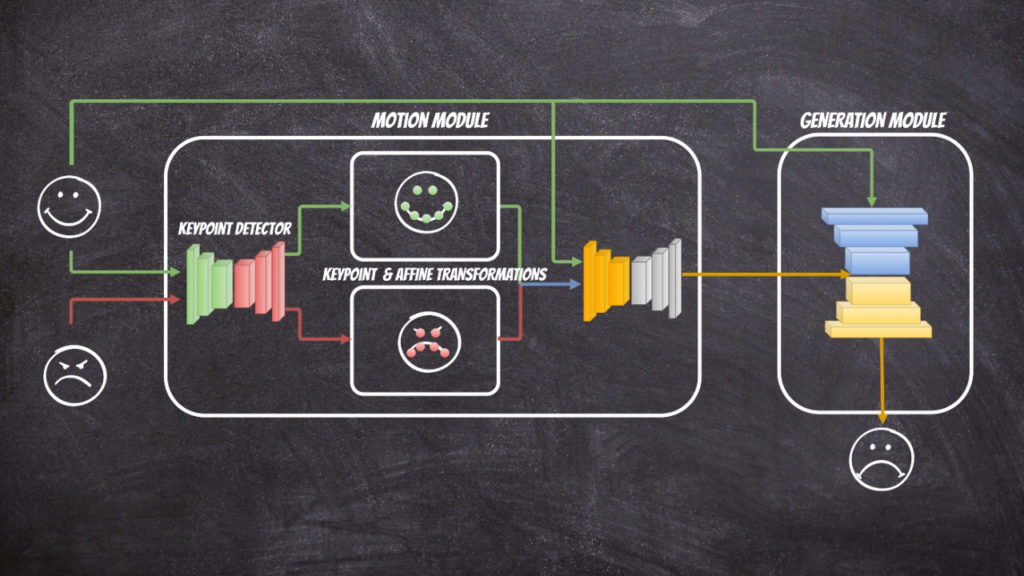
In this project I have used github implementation: https://github.com/AliaksandrSiarohin/first-order-model. Where the extensive description of the neural network architecture can be found in this paper. The solution contains of two parts: motion module and generation module. The motion module at the first stage extracts the key points from the source and target image. In fact in the solution we assume that reference image which we can to the source and target image exists and at the first stage the transformations from reference image to source ([latex]T_{S \leftarrow R} (p_k)[/latex]) and target ([latex]T_{T \leftarrow R} (p_k)[/latex]) image is calculated respectively. Then the first order Taylor expansions [latex]\frac{d}{dp}T_{S \leftarrow R} (p)| {p=p_k}[/latex] and [latex]\frac{d}{dp}T_{T \leftarrow R} (p)| {p=p_k}[/latex] is used to calculate dense motion field. The generation module use calculated dense motion field and source image to generate new image that will resemble target image.
The whole solution is packed into docker image thus we can simply reproduce the results using command:
docker run -it --rm --gpus all -v $(pwd)/torch_models:/root/.torch/models -v $(pwd)/checkpoints:/ai/checkpoints -v $(pwd)/test:/ai/test qooba/aifacereeanactment python3 ./prepare.py --source_image /ai/test/test.jpg --driving_video /ai/test/test.mp4 --output /ai/test/test_generated.mp4
NOTE: additional volumes (torch_models and checkpoints) are mount because during first run the trained neural networks are downloaded.
To reproduce the results we need to provide two files motion video and source image. In above example I put them into test directory and mount it into docker container (-v $(pwd)/test:/ai/test) to use them into it.
Below you have all command line options:
usage: prepare.py [-h] [--config CONFIG] [--checkpoint CHECKPOINT]
                  [--source_image SOURCE_IMAGE]
                  [--driving_video DRIVING_VIDEO] [--crop_image]
                  [--crop_image_padding CROP_IMAGE_PADDING [CROP_IMAGE_PADDING ...]]
                  [--crop_video] [--output OUTPUT] [--relative]
                  [--no-relative] [--adapt_scale] [--no-adapt_scale]
                  [--find_best_frame] [--best_frame BEST_FRAME] [--cpu]

first-order-model

optional arguments:
  -h, --help            show this help message and exit
  --config CONFIG       path to config
  --checkpoint CHECKPOINT
                        path to checkpoint to restore
  --source_image SOURCE_IMAGE
                        source image
  --driving_video DRIVING_VIDEO
                        driving video
  --crop_image, -ci     autocrop image
  --crop_image_padding CROP_IMAGE_PADDING [CROP_IMAGE_PADDING ...], -cip CROP_IMAGE_PADDING [CROP_IMAGE_PADDING ...]
                        autocrop image paddings left, upper, right, lower
  --crop_video, -cv     autocrop video
  --output OUTPUT       output video
  --relative            use relative or absolute keypoint coordinates
  --no-relative         don't use relative or absolute keypoint coordinates
  --adapt_scale         adapt movement scale based on convex hull of keypoints
  --no-adapt_scale      no adapt movement scale based on convex hull of
                        keypoints
  --find_best_frame     Generate from the frame that is the most alligned with
                        source. (Only for faces, requires face_aligment lib)
  --best_frame BEST_FRAME
                        Set frame to start from.
  --cpu                 cpu mode.