Real-time ingested historical feature store with Iceberg, Feast and Yummy.
25 Jul 2022
In this video I will show how to use Apache Iceberg as a store for historical feature store. Moreover we will build end to end real-time ingestion example with:
- Postgres
- Kafka connect
- Iceberg on Minio
- Feast with Yummy extension
Before you will continue reading please watch short introduction:
Apache Iceberg, is an high-performance table format, which can be used for huge analytic datasets.
Iceberg offers several features like: schema evolution, partition evolution and hidden partitioning, and many more, which can be used to effectively process, petabytes of data.
Read more if you want to learn more about Iceberg features and how it compares to the other lake formats (Delta Lake and Hudi).
Apache Iceberg, is perfect candidate to use as an historical store thus I have decided to integrate it, with the Feast feature store through, Yummy extension.
To show how to use it I will describe end to end solution with the real-time Iceberg ingestion from the other data sources.
To do this, I will use Kafka connect, with Apache Iceberg Sink This can be used, to build Iceberg lake on on-premise s3 store, or to move your data and build a feature store in the cloud.
The Kafka connect inegration is based on the article. The source code of the Iceberg sink is available on getindata/kafka-connect-iceberg-sink.
You can follow the solution in the notebook: example.ipynb and simply reproduce using docker.
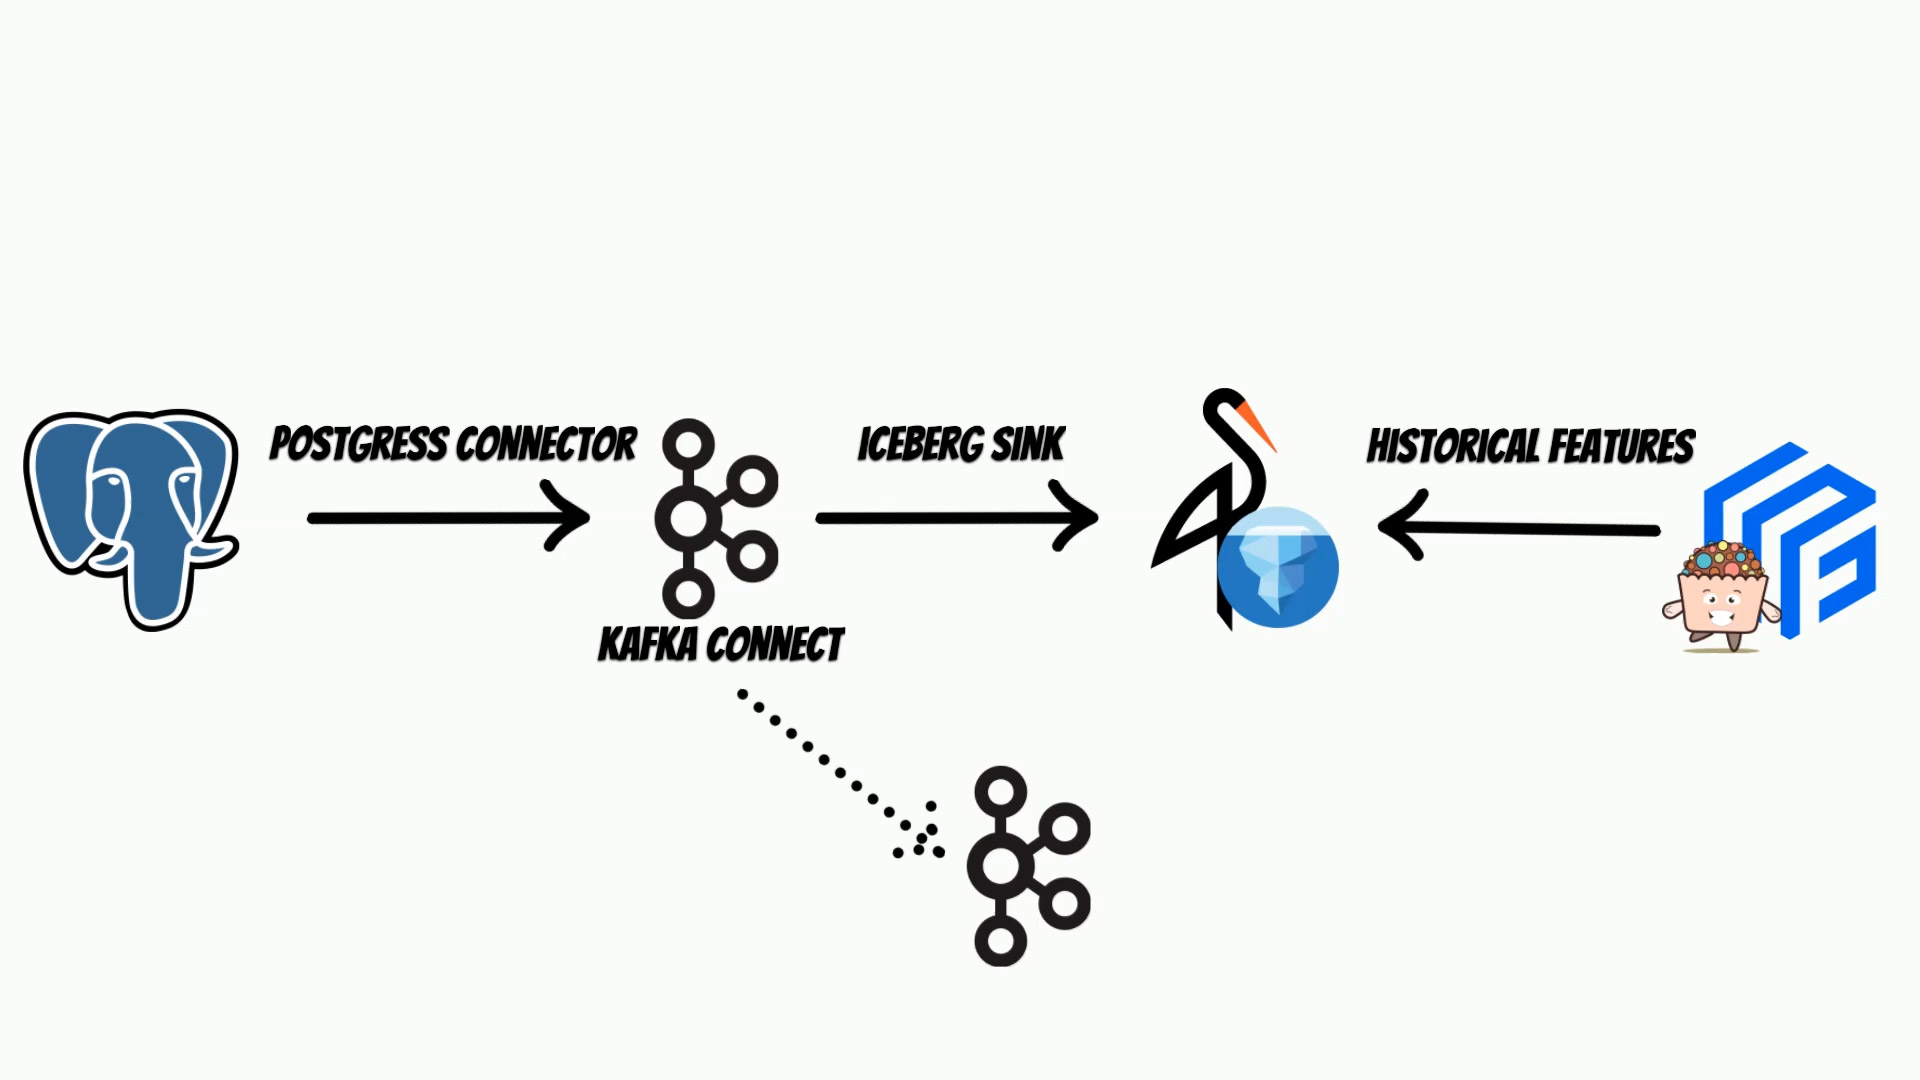
Suppose, we have our transactional system based on the postgres database, where we keep current clients features. We will track features changes, to build historical feature store.
The Kafka Connect, will use debezium postgres connector, to track every data change and put it to the Iceberg using Iceberg sink.
We will store iceberg tables, on the minio s3 store, but of course you can use AWS S3.
Kafka Connect, is based on Kafka, thus we will also need a Kafka instance and zookeeper.
We will setup selected components using docker.
To start clone the repository:
git clone https://github.com/yummyml/yummy-iceberg-kafka-connect.git
cd yummy-iceberg-kafka-connect
Then run ./run.postgres.sh
docker run -it --name postgres --rm --network=app_default \
 -e POSTGRES_PASSWORD=postgres \
 -p 5432:5432 postgres:12.11 -c wal_level=logical
./run.zookeeper.sh
docker run -it --rm --name zookeeper --network app_default \
 -e ZOOKEEPER_CLIENT_PORT=2181 -e ZOOKEEPER_TICK_TIME=2000 \
 confluentinc/cp-zookeeper:7.2.0
./run.kafka.sh
docker run -it --rm --name kafka --network app_default -p 9092:9092 \
 -e KAFKA_BROKER_ID=1 -e KAFKA_ZOOKEEPER_CONNECT=zookeeper:2181 \
 -e KAFKA_ADVERTISED_LISTENERS=PLAINTEXT://kafka:29092,PLAINTEXT_HOST://kafka:9092 \
 -e KAFKA_LISTENER_SECURITY_PROTOCOL_MAP=PLAINTEXT:PLAINTEXT,PLAINTEXT_HOST:PLAINTEXT \
 -e KAFKA_INTER_BROKER_LISTENER_NAME=PLAINTEXT \
 -e KAFKA_OFFSETS_TOPIC_REPLICATION_FACTOR=1 \
 confluentinc/cp-kafka:7.2.0
./run.minio.sh
docker run --rm -it -p 9000:9000 \
 -p 9001:9001 --name minio \
 -v $(pwd)/minio-data:/data \
 --network app_default \
 minio/minio server /data --console-address ":9001"
./run.connect.sh
docker run -it --name connect --rm --network=app_default -p 8083:8083 \
        -e GROUP_ID=1 \
        -e CONFIG_STORAGE_TOPIC=my-connect-configs \
        -e OFFSET_STORAGE_TOPIC=my-connect-offsets \
        -e BOOTSTRAP_SERVERS=kafka:9092 \
        -e CONNECT_TOPIC_CREATION_ENABLE=true \
        -v $(pwd)/kafka-connect-iceberg-sink/kafka-connect-iceberg-sink-0.1.3-shaded.jar:/kafka/connect/kafka-connect-iceberg-sink/kafka-connect-iceberg-sink-0.1.3-shaded.jar \
        debezium/connect:2.0
Please note that components setup is not production ready and you should use only for testing purposes.
Finally we will run the local jupyter notebooks with the local spark: ./run.yummy.sh
docker run -it -p 8887:8888 --rm --shm-size=5.09gb --name yummy \
	--network app_default \
	-v $(pwd)/notebooks:/home/jovyan/notebooks \
	qooba/yummy:v0.0.2_spark /home/jovyan/notebooks/jupyter.sh
where jupyter.sh is:
#!/bin/bash

export FEAST_USAGE=False
export PYSPARK_PYTHON=/opt/conda/bin/python3
export PYSPARK_DRIVER_PYTHON=jupyter
export PYSPARK_DRIVER_PYTHON_OPTS="notebook --notebook-dir=/home/jovyan --ip='0.0.0.0' --port=8888 --no-browser --allow-root --NotebookApp.password='' --NotebookApp.token=''"

#pip3 install rise

pyspark \
    --packages org.apache.iceberg:iceberg-spark-runtime-3.2_2.12:0.13.2,org.apache.hadoop:hadoop-aws:3.3.1,software.amazon.awssdk:s3:2.17.131 \
    --conf "spark.driver.memory=5g" \
    --conf "spark.executor.memory=5g" \
    --conf "spark.sql.extensions=org.apache.iceberg.spark.extensions.IcebergSparkSessionExtensions" \
    --conf "spark.sql.catalog.local=org.apache.iceberg.spark.SparkCatalog" \
    --conf "spark.sql.catalog.local.type=hadoop" \
    --conf "spark.sql.catalog.local.warehouse=s3a://mybucket" \
    --conf "spark.hadoop.fs.s3a.endpoint=http://minio:9000" \
    --conf "spark.hadoop.fs.s3a.access.key=minioadmin" \
    --conf "spark.hadoop.fs.s3a.secret.key=minioadmin" \
    --conf "spark.hadoop.fs.s3a.impl=org.apache.hadoop.fs.s3a.S3AFileSystem" \
    --conf "spark.hadoop.fs.s3a.path.style.access=true" \
    --conf "spark.hadoop.fs.s3a.connection.ssl.enabled=false"
Now open the browser url: http://localhost:8887/tree/notebooks
All below commands are already in the example.ipynb
notebook but I will explain all of them.
Kafka Connect, will publish database changes to the kafka, thus we also need to create appropriate topics, if we don’t have topics auto-creation enabled.
from confluent_kafka.admin import AdminClient, NewTopic


admin_client = AdminClient({
    "bootstrap.servers": "kafka:9092"
})

topic_list = []
topic_list.append(NewTopic("postgres.public.mystats_fv1", 1, 1))
topic_list.append(NewTopic("postgres.public.mystats_fv2", 1, 1))
admin_client.create_topics(topic_list)
I have created two topics because we will track the two postgress tables.
Now, we can setup a postgres connector, and Iceberg sink through, Kafka connect api.
In the postgres connector, we need to specify a list of tables, which we want to track.
import requests
import json

data = {
  "name": "postgres-connector",
  "config": {
    "connector.class": "io.debezium.connector.postgresql.PostgresConnector",
    "database.hostname": "postgres",
    "database.port": "5432",
    "database.user": "postgres",
    "database.password": "postgres",
    "database.dbname" : "postgres",
    "database.server.name": "postgres",
    "slot.name": "debezium",
    "plugin.name": "pgoutput",
    "table.include.list": "public.mystats_fv1,public.mystats_fv2"
  }
}

headers = { "Content-Type": "application/json" }
url="http://connect:8083/connectors"
requests.post(url, headers=headers, data=json.dumps(data))
Because debezium, has a wide range of integrations you can also use other databases like: mysql, mongodb, oracle, sql server or db2.
In the next step, we will post iceberg sink configuration, where we specify the topics to read, but also table and s3 store configuration.
import requests
import json
data = {
  "name": "iceberg-sink",
  "config": {
    "connector.class": "com.getindata.kafka.connect.iceberg.sink.IcebergSink",
    "topics": "postgres.public.mystats_fv1,postgres.public.mystats_fv2",
    "upsert": False,
    "upsert.keep-deletes": True,
    "table.auto-create": True,
    "table.write-format": "parquet",
    "table.namespace": "mytable_dbz",
    "table.prefix": "debeziumcdc_",
    "iceberg.warehouse": "s3a://mybucket",
    "iceberg.fs.defaultFS": "s3a://mybucket",
    "iceberg.catalog-name": "mycatalog",
    "iceberg.catalog-impl": "org.apache.iceberg.hadoop.HadoopCatalog",
    "iceberg.fs.s3a.path.style.access": True,
    "iceberg.fs.s3a.endpoint": "http://minio:9000",
    "iceberg.fs.s3a.impl": "org.apache.hadoop.fs.s3a.S3AFileSystem",
    "iceberg.fs.s3a.access.key": "minioadmin",
    "iceberg.fs.s3a.secret.key": "minioadmin",
  }
}

headers = { "Content-Type": "application/json" }
url="http://connect:8083/connectors"
requests.post(url, headers=headers, data=json.dumps(data))
Kafka connect is ready, thus we will simulate database changes, using generated data. We will split features, into two tables.
import pandas as pd
import numpy as np
from datetime import datetime, timezone
from sklearn.datasets import make_hastie_10_2
import warnings
import psycopg2
import pandas as pd
from sqlalchemy import create_engine
warnings.filterwarnings("ignore", category=DeprecationWarning)

DATABASE_HOST='postgres';
DATABASE_USER='postgres';
DATABASE_PASSWORD='postgres';
DATABASE_NAME='postgres';

def generate_entities(size):
    return np.random.choice(size, size=size, replace=False)

def generate_data(entities, year=2021, month=10, day=1) -> pd.DataFrame:
    n_samples=len(entities)
    X, y = make_hastie_10_2(n_samples=n_samples, random_state=0)
    df = pd.DataFrame(X, columns=["f0", "f1", "f2", "f3", "f4", "f5", "f6", "f7", "f8", "f9"])
    df["y"]=y
    df['entity_id'] = entities
    df['datetime'] = pd.to_datetime(
            np.random.randint(
                datetime(year, month, day, 0,tzinfo=timezone.utc).timestamp(),
                datetime(year, month, day, 22,tzinfo=timezone.utc).timestamp(),
                size=n_samples),
        unit="s",
    )
    df['created'] = pd.to_datetime(
            datetime.now(),
            )
    return df

entities=generate_entities(100)
alchemyEngine = create_engine('postgresql+psycopg2://postgres:postgres@postgres', pool_recycle=3600);
dbConnection = alchemyEngine.connect();

for d in range(1,15):
    data=generate_data(entities,month=1, day=d)
    fv1 = data[["entity_id", "datetime", "f0", "f1", "f2", "f3", "f4"]]
    fv2 = data[["entity_id", "datetime", "f5", "f6", "f7", "f8", "f9", "y"]]
    fv1.to_sql('mystats_fv1', dbConnection, if_exists='replace')
    fv2.to_sql('mystats_fv2', dbConnection, if_exists='replace')
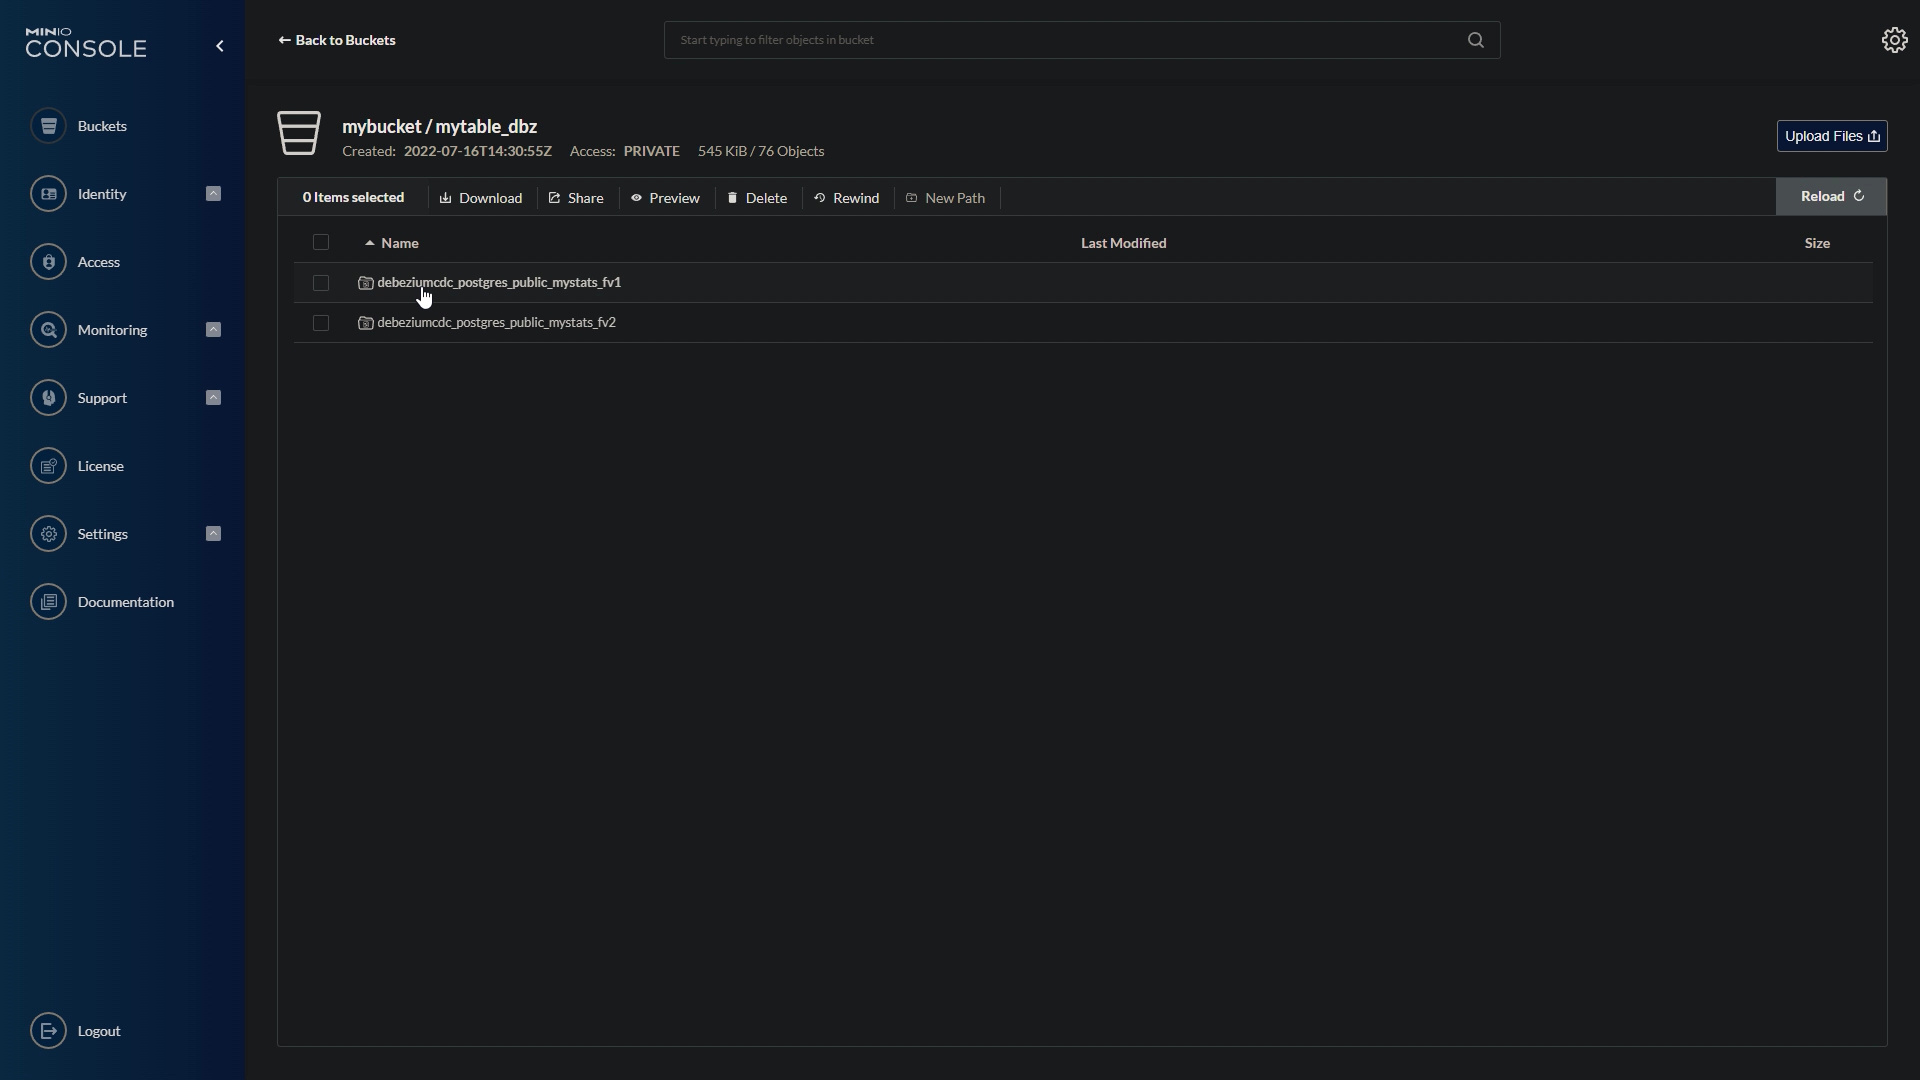
The historical features, will be saved into an iceberg on minio.
minio_console.jpeg
Now we are ready to fetch historical features, using feast and yummy.
To use Yummy with the Iceberg you need to install it:
pip install yummy
Then we need to prepare feature store configuration yaml.
project: example_feature_repo
registry: data/registry.db
provider: local
offline_store:
  type: yummy.YummyOfflineStore
  backend: spark
  config:
    spark.master: "local[*]"
    spark.ui.enabled: "false"
    spark.eventLog.enabled: "false"
    spark.sql.session.timeZone: "UTC"
    spark.sql.extensions: "org.apache.iceberg.spark.extensions.IcebergSparkSessionExtensions"
    spark.sql.catalog.local: "org.apache.iceberg.spark.SparkCatalog"
    spark.sql.catalog.local.type: "hadoop"
    spark.sql.catalog.local.warehouse: "s3a://mybucket"
    spark.hadoop.fs.s3a.endpoint: "http://minio:9000"
    spark.hadoop.fs.s3a.access.key: "minioadmin"
    spark.hadoop.fs.s3a.secret.key: "minioadmin"
    spark.hadoop.fs.s3a.impl: "org.apache.hadoop.fs.s3a.S3AFileSystem"
    spark.hadoop.fs.s3a.path.style.access: "true"
    spark.hadoop.fs.s3a.connection.ssl.enabled: "false"
online_store:
  path: data/online_store.db
Currently, you can use Iceberg, only with the spark backend. You can also, add additional spark configuration, such as catalog configuration or s3 store configuration.
In the next step, you have to add Iceberg Data Source. In the feature store definition, you specify a path to the iceberg table or table name, which you want to consume on filesystem or s3 store respectively.
from datetime import datetime, timezone, timedelta
from google.protobuf.duration_pb2 import Duration
from feast import Entity, Feature, FeatureView, ValueType
from yummy import IcebergDataSource

entity = Entity(name="entity_id", value_type=ValueType.INT64, description="entity id",)

fv1 = FeatureView(
    name="debeziumcdc_postgres_public_mystats_fv1",
    entities=["entity_id"],
    ttl=Duration(seconds=3600*24*20),
    features=[
        Feature(name="f0", dtype=ValueType.FLOAT), Feature(name="f1", dtype=ValueType.FLOAT),
        Feature(name="f2", dtype=ValueType.FLOAT), Feature(name="f3", dtype=ValueType.FLOAT),
        Feature(name="f4", dtype=ValueType.FLOAT), ],
    online=True,
    input=IcebergDataSource(
            path="local.mytable_dbz.debeziumcdc_postgres_public_mystats_fv1",
            event_timestamp_column="__source_ts",
    ), tags={},)

fv2 = FeatureView(
    name="debeziumcdc_postgres_public_mystats_fv2",
    entities=["entity_id"],
    ttl=Duration(seconds=3600*24*20),
    features=[
        Feature(name="f5", dtype=ValueType.FLOAT), Feature(name="f6", dtype=ValueType.FLOAT),
        Feature(name="f7", dtype=ValueType.FLOAT), Feature(name="f8", dtype=ValueType.FLOAT),
        Feature(name="f9", dtype=ValueType.FLOAT), Feature(name="y", dtype=ValueType.FLOAT), ],
    online=True,
    input=IcebergDataSource(
            path="local.mytable_dbz.debeziumcdc_postgres_public_mystats_fv2",
            event_timestamp_column="__source_ts",
    ), tags={},)
Of course, you can combine the Iceberg data source, with the other data sources like parquets, csv files or even delta lake if needed. Here you see how to do this.
Now, we are ready to apply feature store definition, and fetch historical features.
feast apply
import pandas as pd
import numpy as np
from datetime import datetime, timezone, timedelta
from feast import FeatureStore

def generate_entities(size: int):
    return np.random.choice(size, size=size, replace=False)

def entity_df(size:int = 10):
    entities=generate_entities(size)
    entity_df = pd.DataFrame(data=entities, columns=['entity_id'])
    entity_df["event_timestamp"]=datetime.now()
    return entity_df

entity_df = entity_df()
FeatureStore(".").get_historical_features(
    features=[
        "debeziumcdc_postgres_public_mystats_fv1:f0", "debeziumcdc_postgres_public_mystats_fv1:f1",
        "debeziumcdc_postgres_public_mystats_fv1:f2", "debeziumcdc_postgres_public_mystats_fv1:f3",
        "debeziumcdc_postgres_public_mystats_fv1:f4", "debeziumcdc_postgres_public_mystats_fv2:f5",
        "debeziumcdc_postgres_public_mystats_fv2:f6", "debeziumcdc_postgres_public_mystats_fv2:f7",
        "debeziumcdc_postgres_public_mystats_fv2:f8", "debeziumcdc_postgres_public_mystats_fv2:f9",
    ], entity_df=entity_df, full_feature_names=True).to_df()