TinyMLOps with Arduino
30 Jul 2021
In this article I will show how to build MLOps process TinyML on Arduino Nano 33 BLE Sense.
Before you will continue reading please watch short introduction:
In the last article (TinyML with Arduino) I have shown the example TinyML model which will classify jelly bears using RGB sensor. The next step, will be to build a process that will simplify, the model versions management, and the deployment.
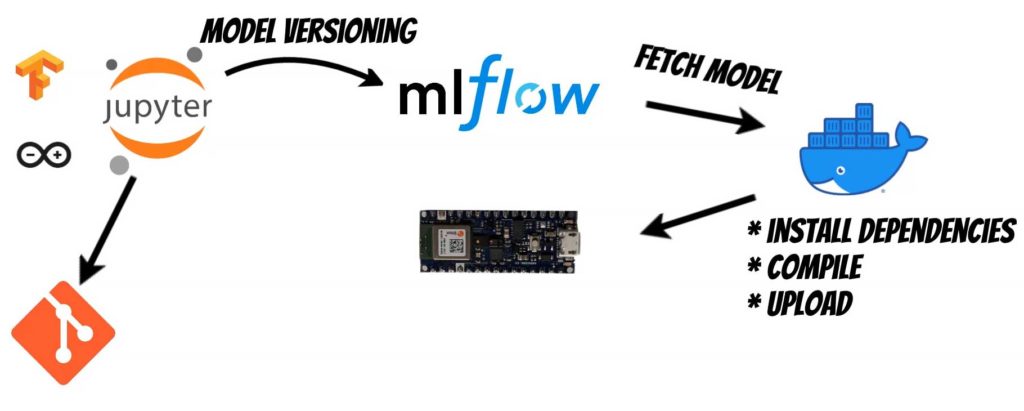
The MLflow project is prepared in the Jupyter Notebook. Then we can convert the Notebook to the python code using nbdev library and version it in the Git repository.
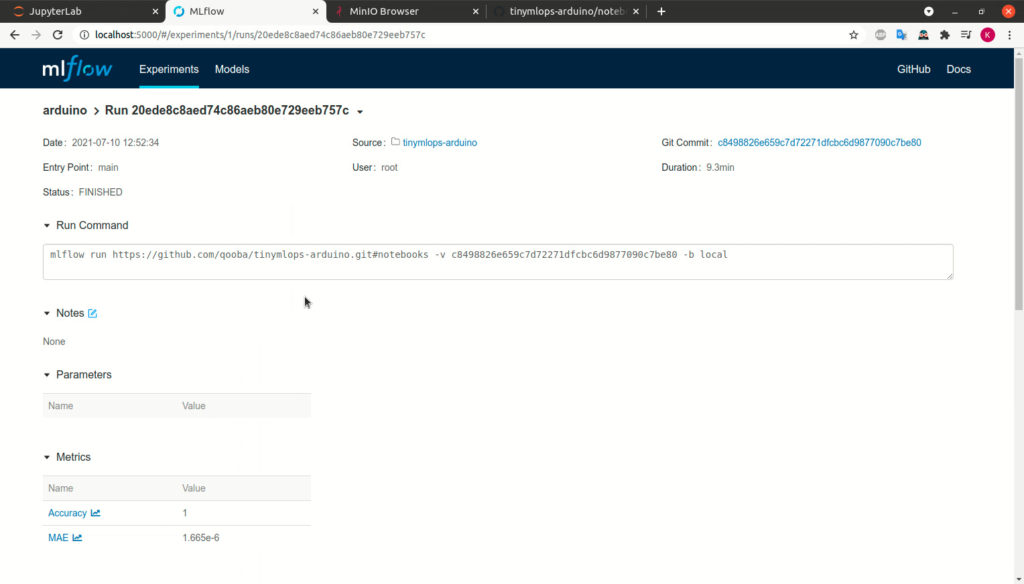
Now we are ready to run the MLflow project using command:
mlflow run https://git_repository.git#path --no-conda --experiment-name="arduino"
The model is saved in the MLflow registry and the model version is associated with the git commit version.
The MLflow model contains additional artifacts:
- artifacts.ino - the arduino code which loads and uses the model
- model.h - the Tensorflow Lite model encoded to hex
- reduirements.ino.txt - the list of Arduino dependencies required by the arduino code
Example requirements.ino.txt file:
Arduino_TensorFlowLite@2.4.0-ALPHA
Arduino_APDS9960@1.0.3
Arduino_HTS221@1.0.0
Arduino_LPS22HB@1.0.1
Arduino_LSM9DS1@1.1.0
arduinoFFT@1.5.6

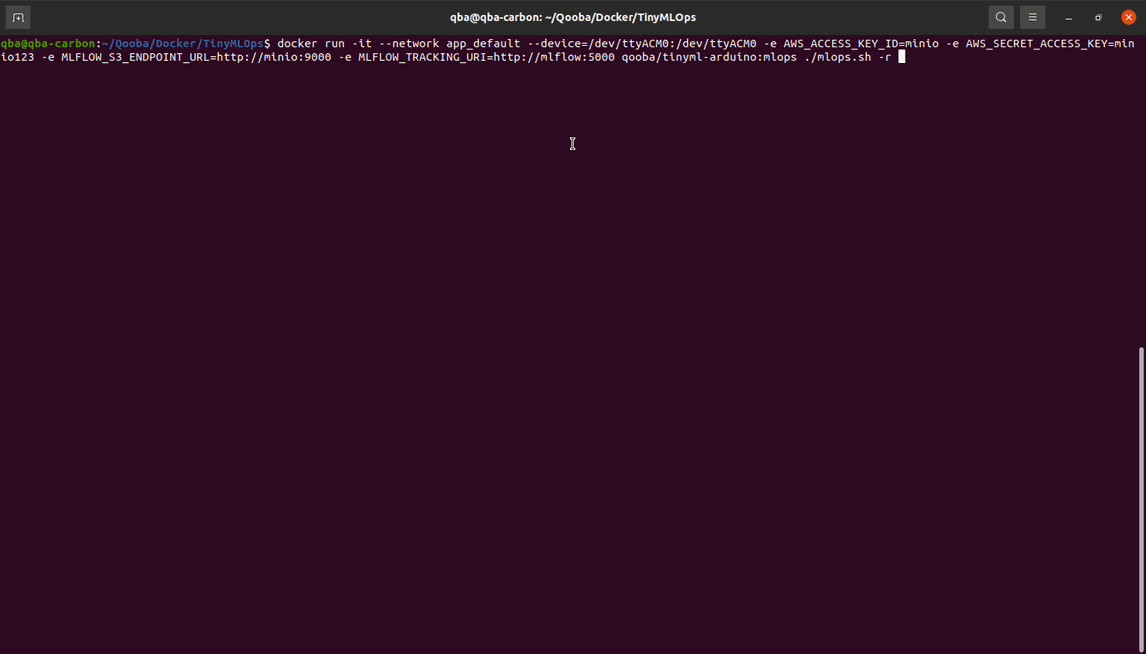
Finally we can run the command:
docker run -it --network app_default --device=/dev/ttyACM0:/dev/ttyACM0 -e AWS_ACCESS_KEY_ID=minio -e AWS_SECRET_ACCESS_KEY=minio123 -e MLFLOW_S3_ENDPOINT_URL=http://minio:9000 -e MLFLOW_TRACKING_URI=http://mlflow:5000 qooba/tinyml-arduino:mlops ./mlops.sh -r ${RUN_ID}
where:
- –device=/dev/ttyACM0 - is arduino device connected using USB
- AWS_ACCESS_KEY_ID and AWS_SECRET_ACCESS_KEY - are minio credentials
- MLFLOW_S3_ENDPOINT_URL - is minio url
- MLFLOW_TRACKING_URI - is mlflow url
- ${RUN_ID} - is run id of model saved in MLflow registry
Additionally we have several command line options:
ARDUINO MLOPS

Syntax: docker run -it qooba/tinyml-arduino:mlops -h [-r MLFLOW_RUN_ID] [-s ARDUINO_SERIAL] [-c ARDUINO_CORE] [-m ARDUINO_MODEL]
options:
-h|--help     Print help
-r|--run      MLflow run id
-s|--serial   Arduino device serial (default: /dev/ttyACM0)
-c|--core     Arduino core (default: arduino:mbed_nano)
-m|--model    Arduino model (default: arduino:mbed_nano:nano33ble)
After running the code the docker image qooba/tinyml-arduino:mlops
will fetch the model for indicated RUN_ID from MLFlow.
Then it will install required dependencies using the file requirements.ino.txt.
It will compile the model and the Arduino code. And finally upload it to the device.
Thanks to this, we can more easily manage subsequent versions of models, and automate the deployment process.