Quantum computing nowadays is the one of the hottest topics in the computer science world.
Recently IBM unveiled the IBM Q System One: a 20-qubit quantum computer which is touting as “the world’s first fully integrated universal quantum computing system designed for scientific and commercial use”.
In this article I’d like how to show the quantum teleportation phenomenon. I will use the Q# language designed by Microsoft to simplify creating quantum algorithms.
In this example I have used the quantum simulator which I have wrapped with the REST api and put into the docker image.
Quantum teleportation allows moving a quantum state from one location to another. Shared quantum entanglement between two particles in the sending and receiving locations is used to do this without having to move physical particles along with it.
1. Theory
Let’s assume that we want to send the message, specific quantum state described using Dirac notation:
[latex display=”true”]
\psi\rangle=\alpha
0\rangle+\beta
1\rangle[/latex]
Additionally we have two entangled qubits, first in Laboratory 1 and second in Laboratory 2:
[latex display=”true”]
\phi^+\rangle=\frac{1}{\sqrt{2}}(
00\rangle+
11\rangle)[/latex]
thus we starting with the input state:
[latex display=”true”]
\psi\rangle
\phi^+\rangle=(\alpha
0\rangle+\beta
1\rangle)(\frac{1}{\sqrt{2}}(
00\rangle+
11\rangle))[/latex]
[latex display=”true”]
\psi\rangle
\phi^+\rangle=\frac{\alpha}{\sqrt{2}}
000\rangle + \frac{\alpha}{\sqrt{2}}
011\rangle + \frac{\beta}{\sqrt{2}}
100\rangle + \frac{\beta}{\sqrt{2}}
111\rangle [/latex]
To send the message we need to start with two operations applying CNOT and then Hadamard gate.
CNOT gate flips the second qubit only if the first qubit is 1.
Applying CNOT gate will modify the first qubit of the input state and will result in:
Then we measure the states of the first two qubits (message qubit and Laboratory 1 qubit) where we can have four results:
[latex]
00\rangle[/latex] which simplifies equation to: [latex]
00\rangle(\alpha
0\rangle+\beta
1\rangle)[/latex] and indicates that the qubit in the Laboratory 2 is [latex]\alpha
0\rangle+\beta
1\rangle[/latex]
[latex]
01\rangle[/latex] which simplifies equation to: [latex]
01\rangle(\alpha
1\rangle+\beta
0\rangle)[/latex] and indicates that the qubit in the Laboratory 2 is [latex]\alpha
1\rangle+\beta
0\rangle[/latex]
[latex]
10\rangle[/latex] which simplifies equation to: [latex]
10\rangle(\alpha
0\rangle-\beta
1\rangle)[/latex] and indicates that the qubit in the Laboratory 2 is [latex]\alpha
0\rangle-\beta
1\rangle[/latex]
[latex]
11\rangle[/latex] which simplifies equation to: [latex]
11\rangle(\alpha
1\rangle-\beta
0\rangle)[/latex] and indicates that the qubit in the Laboratory 2 is [latex]\alpha
1\rangle-\beta
0\rangle[/latex]
Now we have to send the result classical way from Laboratory 1 to Laboratory 2.
Finally we know what transformation we need to apply to qubit in the Laboratory 2
to make its state equal to message qubit:
[latex display=”true”]
\psi\rangle=\alpha
0\rangle+\beta
1\rangle[/latex]
if Laboratory 2 qubit is in state:
[latex]\alpha
0\rangle+\beta
1\rangle[/latex] we don’t need to do anything.
[latex]\alpha
1\rangle+\beta
0\rangle[/latex] we need to apply NOT gate.
[latex]\alpha
0\rangle-\beta
1\rangle[/latex] we need to apply Z gate.
[latex]\alpha
1\rangle-\beta
0\rangle[/latex] we need to apply NOT gate followed by Z gate
This operations will transform Laboratory 2 qubit state to initial message qubit state thus we moved the particle state from Laboratory 1 to Laboratory 2 without moving particle.
2. Code
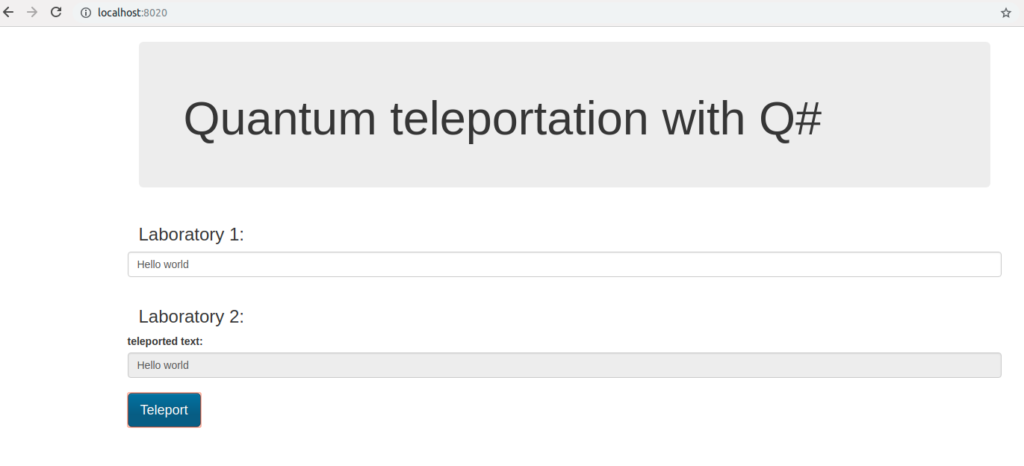
Now it’s time to show the quantum teleportation using Q# language. I have used Microsoft Quantum Development Kit to run the Q# code inside the .NET Core application. Additionally I have added the nginx proxy with the angular gui which will help to show the results.
Everything was put inside the docker to simplify the setup.
Then we can put the message in the Laboratory 1, click the Teleport button, trigger for the teleportation process which sends the message to the Laboratory 2.
The text is converted into array of bits and each bit is sent to the Laboratory 2 using quantum teleportation.
In the first step we encode the incoming message using X gate.
if (message) {
    X(msg);
}
Then we prepare the entanglement between the qubits in the Laboratory 1 and Laboratory 2.
H(here);
CNOT(here, there);
In the second step we apply CNOT and Hadamard gate to send the message:
CNOT(msg, here);
H(msg);
Finally we measure the message qubit and the Laboratory 1 qubit:
if (M(msg) == One) {
    Z(there);
}

if (M(here) == One) {
    X(there);
}
If the message qubit has state [latex]
1\rangle[/latex] then we need to apply the Z gate to the Laboratory 2 qubit.
If the Laboratory 1 qubit has state [latex]
1\rangle[/latex] then we need to apply the X gate to the Laboratory 2 qubit. This information must be sent classical way to the Laboratory 2.
Now the Laboratory 2 qubit state is equal to the initial message qubit state and we can check it:
if (M(there) == One) {
    set measurement = true;
}
This kind of communication is secure because even if someone will take over the information sent classical way it is still impossible to decode the message.
Elastic search is powerful search engine. Its distributed architecture give ability to build scalable full-text search solution. Additionally it provides comprehensive query language.
Despite this sometimes the engine and search results is not enough to meet the expectations of users. In such situations it is possible to boost search quality using machine learning algorithms.
Before you will continue reading please watch short introduction:
https://youtu.be/etYrtgIf3hc
In this article I will show how to do this using RankLib library and LambdaMart algorithm . Moreover I have created ready to use platform which:
Index the data
Helps to label the search results in the user friendly way
Trains the model
Deploys the model to elastic search
Helps to test the model
The whole project is setup on the docker using docker compose thus you can setup it very easy.
The platform is based on the elasticsearch learning to rank plugin. I have also used the python example described in this project.
A. The ngnix reverse proxy with angular app
B. The flask python app which orchestrates the whole ML solution
C. The elastic search with rank lib plugin installed
A. Ngnix
I have used the Ngnix reverse proxy to expose the flask api and the angular gui which helps with going through the whole proces.
This is the core of the project. It exposes api for:
Indexing
Labeling
Training
Testing
It calls directly the elastic search to get the data and do the modifications.
Because training with RankLib require the java thus Docker file for this part contains default-jre installation. Additionally it downloads the RankLib-2.8.jar and tmdb.json (which is used as a default data source) from: http://es-learn-to-rank.labs.o19s.com/.
Dockerfile
FROM python:3

RUN \
    apt update && \
    apt-get -yq install default-jre
RUN mkdir -p /opt/services/flaskapp/src
COPY . /opt/services/flaskapp/src
WORKDIR /opt/services/flaskapp/src
RUN pip install -r requirements.txt
RUN python /opt/services/flaskapp/src/prepare.py
EXPOSE 5090
CMD ["python", "-u", "app.py"]
C. Elastic search
As mentioned before it is the instance of elastic search with the rank lib plugin installed
Dockerfile
FROM docker.elastic.co/elasticsearch/elasticsearch:6.2.4
RUN /usr/share/elasticsearch/bin/elasticsearch-plugin install \
-b http://es-learn-to-rank.labs.o19s.com/ltr-1.1.0-es6.2.4.zip
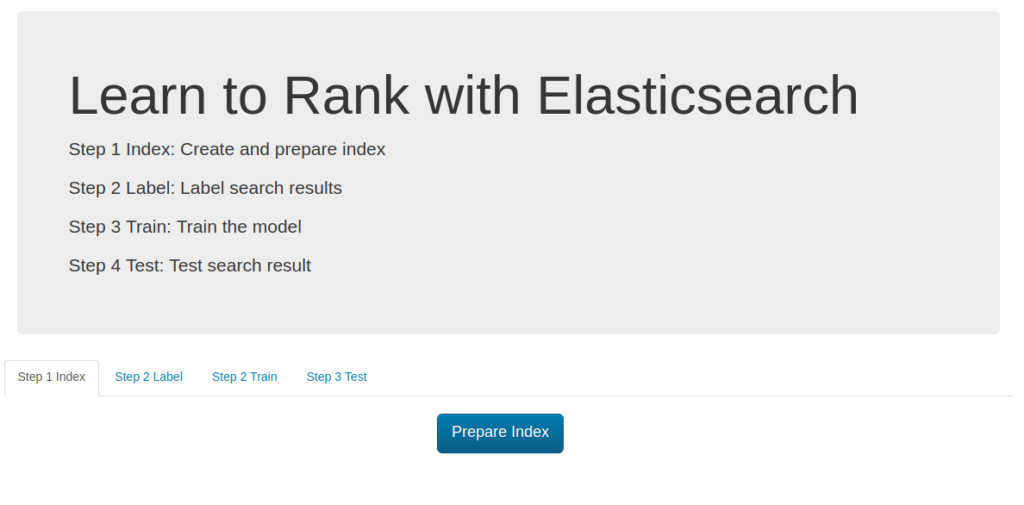
The platform helps to run and understand the whole process thought four steps:
A. Indexing the data
B. Labeling the search results
C. Training the model
D. Testing trained model
A. Indexing
The first step is obvious thus I will summarize it shortly. As mentioned before the default data source is taken from tmdb.json file but it can be simply changed using ES_DATA environment variable in the docker-compose.yml :
Clicking Prepare Index the data is taken from ES_DATA file and indexed in the elastic search.
Additionally you can define:
ES_HOST - the elastic search url
ES_USER/ES_PASSWORD - elastic search credentials, by default authentication is turned off
ES_INDEX/ES_TYPE - index/type name for data from ES_DATA file
ES_FEATURE_SET_NAME - name of container for defined features (described later)
ES_MODEL_NAME - name of trained model kept in elastic search (described later)
ES_MODEL_TYPE - algorithm used to train the model (described later).
ES_METRIC_TYPE - metric type (described later)
We can train and keep multiple models in elastic search which can be used for A/B testing.
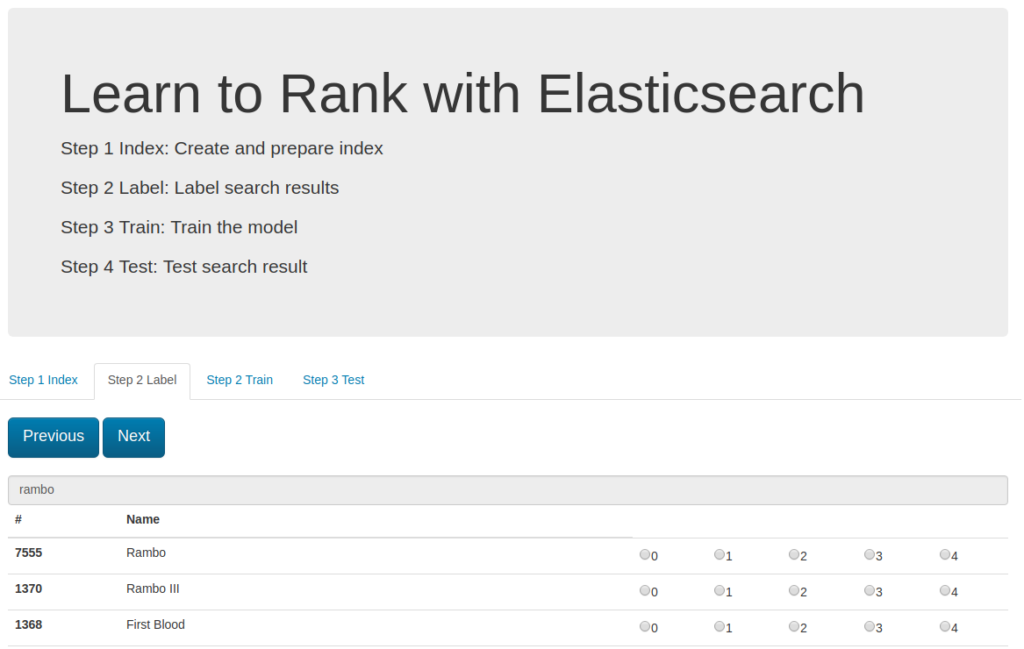
B. Labeling
The supervised learning algorithms like learn to rank needs labeled data thus in this step I will focus on this area.
First of all I have to prepare the file label_list.json which contains the list of queries to label e.g.:
[
    "rambo",
    "terminator",
    "babe",
    "die hard",
    "goonies"
]
When the file is ready I can go to the second tab (Step 2 Label).
For each query item the platform prepare the result candidates which have to be ranked from 0 to 4.
You have to go through the whole list and at the last step
the labeled movies are saved in the file :
# grade (0-4)	queryid	docId	title
#
# Add your keyword strings below, the feature script will
# Use them to populate your query templates
#
# qid:1: rambo
# qid:2: terminator
# qid:3: babe
# qid:4: die hard
#
# https://sourceforge.net/p/lemur/wiki/RankLib%20File%20Format/
#
#
4 qid:1 # 7555 Rambo
4 qid:1 # 1370 Rambo III
4 qid:1 # 1368 First Blood
4 qid:1 # 1369 Rambo: First Blood Part II
0 qid:1 # 31362 In the Line of Duty: The F.B.I. Murders
0 qid:1 # 13258 Son of Rambow
0 qid:1 # 61410 Spud
4 qid:2 # 218 The Terminator
4 qid:2 # 534 Terminator Salvation
4 qid:2 # 87101 Terminator Genisys
4 qid:2 # 61904 Lady Terminator
...
Each labeling cycle is saved to the separate file: timestamp_judgments.txt
C. Training
Now it is time to use labeled data to make elastic search much more smarter. To do this we have to indicate the candidates features.
The features list is defined in the files: 1-4.json in the training-app directory.
Each feature file is elastic search query eg. the **
(which is searched text) match the title property:
{
    "query": {
        "match": {
            "title": ""
        }
    }
}
In this example I have used 4 features:
title match keyword
overview match keyword
keyword is prefix of title
keyword is prefix of overview
I can add more features without code modification, the list of features is defined and read using naming pattern (1-n.json).
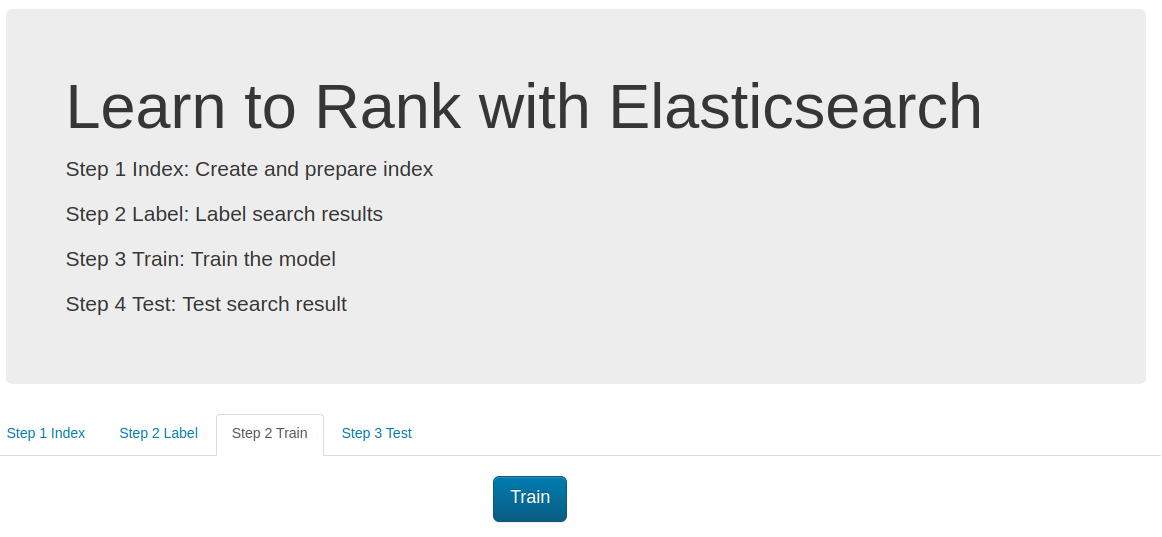
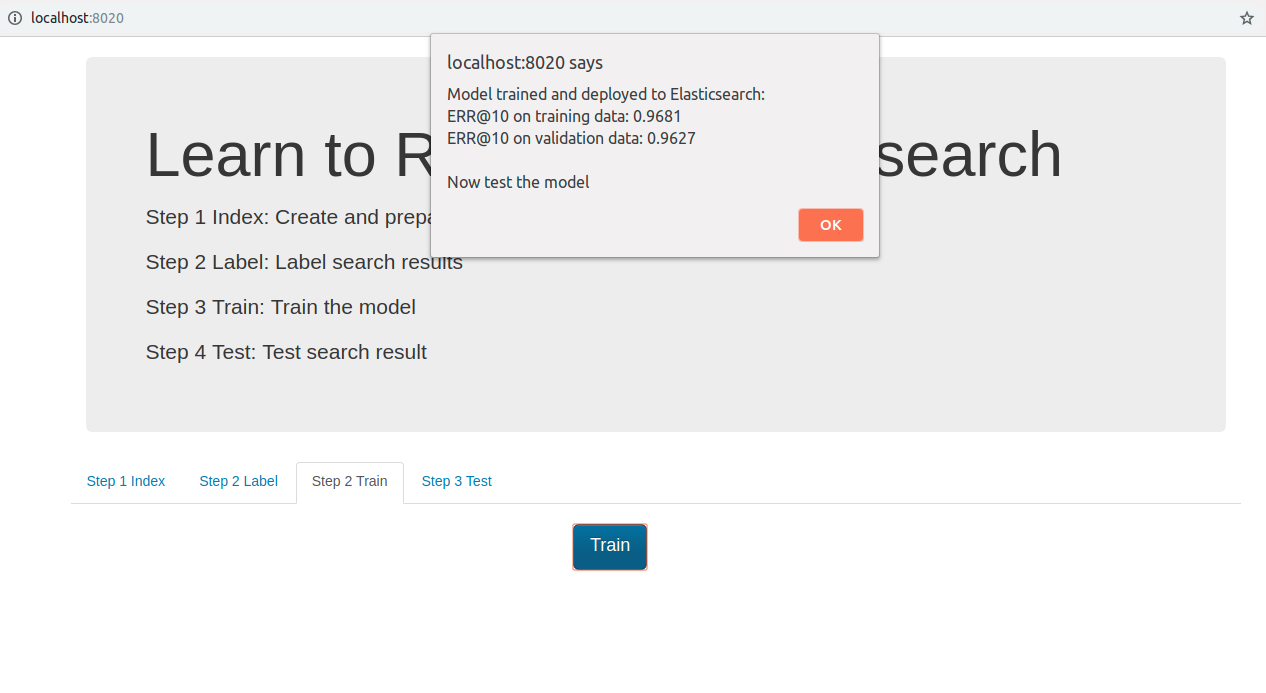
Now I can go to the Step 3 Train tab and simply click the train button.
At the first stage the training app takes all feature files and build the features set which is save in the elastic search (the ES_FEATURE_SET_NAME environment variable defines the name of this set).
In the next step the latest labeling file (ordered by the timestamp) is processed (for each labeled item the feature values are loaded) eg.
4 qid:1 # 7555 Rambo
The app takes the document with id=7555 and gets the elastic search score for fetch defined feature.
The Rambo example is translated into:
Which means that score of feature one is 12.318446 (and respectively 10.573845, 1.0, 1.0 for features 2,3,4 ).
This format is readable for the RankLib library. And the training can be perfomed.
The full list of parameters is available on: [https://sourceforge.net/p/lemur/wiki/RankLib/][https://sourceforge.net/p/lemur/wiki/RankLib/].
The ranker type is chosen using ES_MODEL_TYPE parameter:
0: MART (gradient boosted regression tree)
1: RankNet
2: RankBoost
3: AdaRank
4: Coordinate Ascent
6: LambdaMART
7: ListNet
8: Random Forests
The default used value is LambdaMART.
Additionally setting ES_METRIC_TYPE we can use the optimization metric.
Possible values:
MAP
NDCG@k
DCG@k
P@k
RR@k
ERR@k
The default value is ERR@10
Finally we obtain the trained model which is deployed to the elastic search.
The project can deploy multiple trained models and the deployed model name is defined by ES_MODEL_NAME.
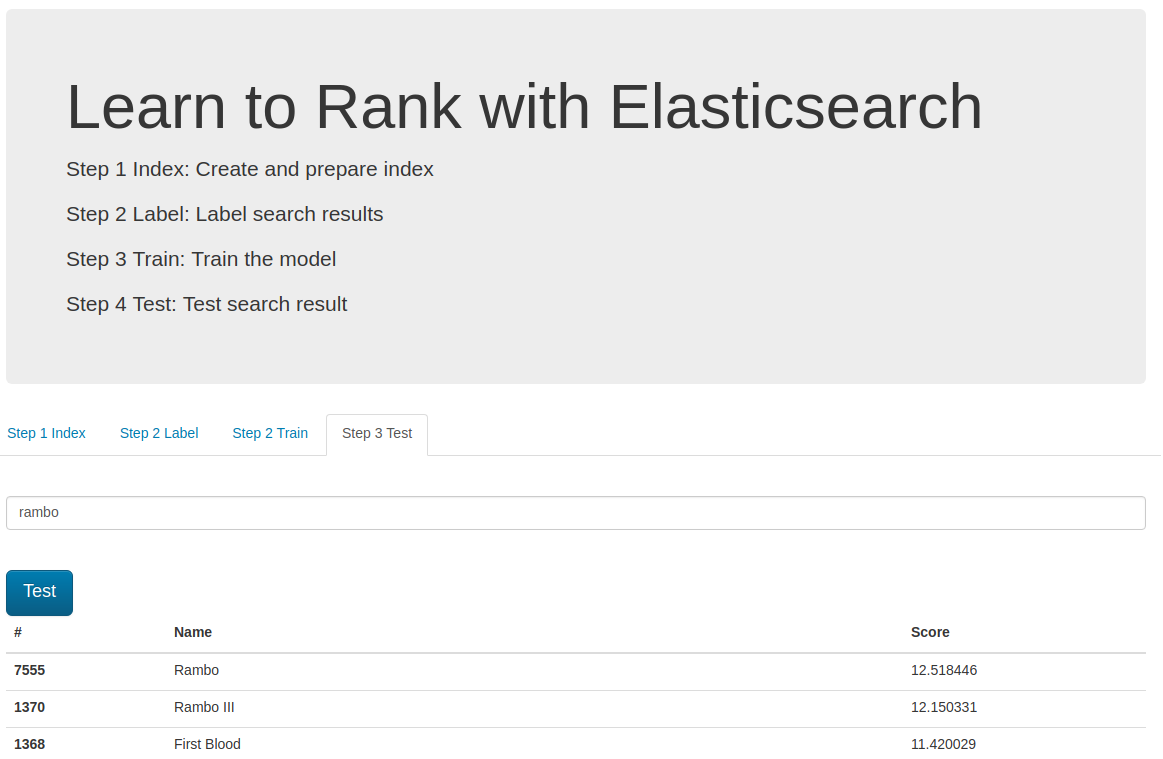
D. Testing
In the last step we can test trained and deployed model.
We can choose the model using the ES_MODEL_NAME parameter.
It is used in the search query and can be different in each request which is useful when we need to perform A/B testing.
Tensorflow meets C# Azure function and … . In this post I would like to show how to deploy tensorflow model with C# Azure function. I will use the TensorflowSharp the .NET bindings to the tensorflow library. The InterceptionInterface will be involved to create http endpoint which will recognize the images.
Code
I will start with creating .net core class library and adding TensorFlowSharp package:
dotnet new classlib
dotnet add package TensorFlowSharp -v 1.9.0
Then create file TensorflowImageClassification.cs:
Here I have defined the http entrypoint for the AzureFunction (Run method). The q query parameter is taken from the url and used as a url of the image which will be recognized.
The solution will analyze the image using the convolutional neural network arranged with the Interception architecture.
The function will automatically download the trained interception model thus the function first run will take little bit longer. The model will be saved to the D:\home\site\wwwroot\.
The convolutional neural network graph will be kept in the memory (graphCache) thus the function don’t have to read the model every request. On the other hand the input image tensor has to be prepared and preprocessed every time (ConstructGraphToNormalizeImage).
Finally I can run command:
dotnet publish
which will create the package for the function deployment.
Azure function
To deploy the code I will create the Azure Function (Consumption) with the http trigger. Additionally I will set the function entry point, the function.json will be defined as:
The kudu will be used to deploy the already prepared package. Additionally I have to deploy the libtensorflow.dll from /runtimes/win7-x64/native (otherwise the Azure Functions won’t load it). The bin directory should look like:
Finally I can test the azure function:
The function recognize the image and returns the label with the highest probability.
Today I’d like to investigate the Databricks. I will show how it works and how to prepare simple recommendation system using collaborative filtering algorithm which can be used to help to match the product to the expectations and preferences of the user. Collaborative filtering algorithm is extremely useful when we know the relations (eg ratings) between products and the users but it is difficult to indicate the most significant features.
In this example I use the movielens small dataset to create recommendations for the movies. After unzipping the package I use the ratings.csv file.
On the main page of Databrick click Upload Data and put the file.
The file will be located on the DBFS (Databrick file system) and will have a path /FileStore/tables/ratings.csv. Now I can start model training.
Notebook
The data is ready thus in the next step I can create the databricks notebook (new notebook option on the databricks main page) similar to Jupyter notebook.
Using databricks I can prepare the recommendation in a few steps:
First of all I read and parse the data, because the data file contains the header additionally I have to cut it. In the next step I split the data into training which will be used to train the model and testing part for model evaluation.
I can simply create the ratings for each user/product pair but also export user and products (in this case movies) features. The features in general are meaningless factors but deeper analysis and intuition can give them meaning eg movie genre. The number of features is defined by the rank parameter in training method (used for model training).
The user/product rating is defined as a scalar product of user and product feature vectors.
This gives us ability to use them outside the databricks eg in relational database prefilter the movies using defined business rules and then order using user/product features.
Finally I have shown how to save the user and product features as a json and put it to Azure blob.
Messanger chatbots are now becoming more and more popular. They can help us order pizzas, ask about the weather or check the news.
In this article, I would like to show you how to build a simple messanger chatbot in python and pass it on AWS lambda. Additionally use the wit.ai service to add to it the natural language understanding functionality and make it more intelligent.
To build the messanger chatbot I will need facebook app and facebook page.
I will copy the AppId and AppSecret which will be needed in the next steps:
Messanger product
Then I will add the messanger product and setup it.
I need to select page we already created and copy generated access token.
Webhook
Finally I have to setup the webhooks for messanger product
To finish this step I need to setup our chatbot on aws lambda.
I also have to provide the verify token which will be used to validate our endpoint.
AWS Lambda
Now I will prepare my chatbot endpoint. I will setup it on the AWS lambda.
Trigger
For my chatbot I need to configure API Gateway.
I have to choose security open otherwise I won’t be able to call it from messanger
Code
I also need to provide code which will handle the messanger webhook and send response.
I will simply put the code in the online editor.
Let’s take a look at the code:
Configuration
Bellow I have to setup environment variables:
verify_token - verification token (I use keepass to generate it) which we will use in webhook setup
access_token - value from the messanger webhook page setup
app_secret - facebook app secret
Now I’m ready to finish the webhook configuration:
I use api gateway url ass Callback URL and verify_token I have just generated.
Natural language undestanding
Messanger give easy way to add natural language undestanding functionality. To add this I simply configure it on messanger product setup page
Here I can choose already trained models but I will go further and I will create custom model.
Messanger will create the new wit.ai project for me.
On the wit.ai I can simply add some intents (like: hungry) and additional information which can be retrieved from the phrase (like: I want some pizza)
The messanger/wit integration is very smooth let’s analyze the webhook json I get when I put I want to eat pizza
After wit integration the nlp object was added. Now I can get the recognized intent with some confidence (like: hungry) and additional entities (like: dish).
We use cookies to ensure that we give you the best experience on our website. If you continue to use this site we will assume that you are happy with it.Ok